Graceful Order

Organizing and Decorating the home.

  • Home
  • Organize
    • Kitchen
    • Laundry
    • Living Room
    • Bedrooms
    • Bathrooms
    • Closets
    • Office
    • Garage
    • Other
  • Decorate
    • Fall
    • Winter
    • Dining Room
    • Bedroom
    • Bathroom
    • Office
  • Clean
    • Kitchen
    • Bathrooms
  • Entertain
    • Christmas
    • Thanksgiving
    • Recipes
    • Reflect

So you Haven’t Ordered Christmas Cards

December 20, 2016 · by Maria · 4 Comments

Your super organized friend had their Christmas cards addressed and stamped the weekend after Thanksgiving, huh?  Well, I’m pretty organized but that was certainly not me this year.  I usually like to take the boy’s Christmas pictures in October, which gives me plenty of time to choose the cards and have them mailed to me, but this year it was the first week of November and no pictures had been taken.  So I went to a local pumpkin patch and the day that they were hauling away the pumpkins, I had the boys stand in front of an old tractor and snapped away.  I was careful to avoid the orange landscape a foot away!  The boys kept telling me through their smiles “let’s get out of here, mom!”  So I got my shots AND embarrassed the boys – double fun!

christmas cards

I decided to order my cards from Tiny Prints, like I did last year and the year before that and so on…  I have never had a problem with that company and every year they have even cuter cards!  What do you think of this barnyard-style card?  Perfect for the tractor picture, right?

christmas cards

But what if you didn’t make it to the pumpkin patch and turkey day went by and still no holiday photo?  Well, you can always choose a design that does not involve a photo, or you can choose to send out a Happy New Years cards, instead.  Of course you don’t have to send out cards at all but I absolutely love sending and receiving cards during this season.  I am happy to say that this year I have received more cards than ever before!

Totally unrelated to cards but totally related to saving time, check out this wrapping paper that is already personalized with your family name!  So stinkin’ cute!  I also picked it up at Tiny Prints.  I only ordered one roll because I wanted to check out the quality and because I like to use all kinds of prints for Christmas, but it was a winner!

gift wrap

Lastly, I ordered a few notebooks for the boy’s teachers, which I will pair with a nice box of chocolates.  There is something so special about personalized items.

notebook christmas

Whether you send out cards or not, have no fear and have no guilt.  I just wanted to send you a little reminder that it’s not too late if you choose to do it and you can send out New Years wishes, instead.  I wish you all a very Merry Christmas and don’t forget to enjoy your family.  Christmas goes by so fast that you have to be intentional about being “present”.

Hugs!

Filed Under: Christmas, Winter · Tagged: Christmas Cards

5 Tips When Hosting Thanksgiving for the First Time

November 22, 2016 · by Maria · Leave a Comment

So you’ve committed yourself to hosting Thanksgiving dinner.  How cool, how scary!  Am I right?!  I mean, this is the dinner party of dinner parties.  How can you possibly pull off this monumental dinner with so many dishes, for so many people?  Ok, so if you weren’t scared before, I’m sure the opening lines of this post did it for ya!  🙂  No worries.  You will be fine.  In many ways, it is just like other dinner party you have hosted, with a few more moving pieces.

There are lots of tips that I have shared with you, to help you have a successful Thanksgiving, but these are specific to those who are hosting for the first time.

  1. Decide on whether it will be potluck style or you will make everything.

5 Tips When Hosting Thanksgiving for the First Time

I prefer to serve everything out of my kitchen because through careful planning and time management, it causes me less stress than waiting for my guests to bring side dishes and wondering if they made enough.  Also, one of the things that can cause a traffic jam in the kitchen, is someone bringing something cold or that needs re-heating.  Oven space is premium real estate on Thanksgiving day and having to constantly place and remove things from the oven can cause you more stress than what you originally saved by not making the dish yourself.

Should you choose to do it potluck style, you can avoid that madness by politely asking guests to bring things already hot or in an insulated bag.  Also, who you decide to assign dishes to is really important.  Don’t assign the appetizers to your favorite aunt who is usually late – let her bring dessert.  One more tip, don’t serve too many appetizers since this is such a big and filling meal.

Which brings me to a third option and it’s usually what I opt for.  I make all the main and side dishes and I delegate the desserts.  I will usually make one or two pies and my guests bring the rest.   I only make pies because there a few that I enjoy making, otherwise I would skip making any dessert and delegate it entirely.  I usually set up my buffet table, allowing for the size serving dishes that I will use, but the dessert table isn’t as orderly, it’s just an empty table with a few decorations and some serving utensils.  As the guests arrive they can place their dessert on that table.

2.  Choose dishes that you can make ahead of time.

5 Tips When Hosting Thanksgiving for the First Time

When choosing your dishes, keep in mind how much oven space you have.  Also, look at their cooking temperature, as they will have to be in the same oven.  Something that cooks at 375 deg and something that cooks at 350 deg, can usually be in the same oven if you set it somewhere in between.  However, something that has to cook at 425 deg. cannot be in an oven with something that cooks at 325 deg – keep that in mind when choosing your dishes.  Another thing to consider is avoiding too many dishes that have to be made at the last-minute.  There is always a bit of a frenzy on Thanksgiving, no matter how much you plan, so last-minute sautéing and bruleing is not going to help.

Most of the dishes that I make are completely prepped the night before and will just heat them up in the oven the following day.  Lastly, dont experiment with new recipes as there are too many variables to control on such a busy cooking day.

3. Order another rack for your oven.

This one didn’t occur to me until last year.  Considering that so many Thanksgiving dishes are casseroles that are baked in standard 9×13, you can usually fit another rack into your oven.  Admittedly, after using it for Thanksgiving and my Christmas brunch, I have not had a need for it and had to store it, but it was helpful enough during the holidays to justify buying it.  I purchased this one through my Amazon store but you will have to search for one specific to your oven dimensions.  It will allow you to place an additional 2 casseroles in the oven.  Note that adding more dishes to your oven may mean that things cook slower, as the heat distribution is altered.  I don’t actually cook 6 casseroles at once anyway but I will re-heat and keep 6 casseroles in there until it’s time to serve.

4. Don’t set up any food stations inside the kitchen.

You will thank me for this one.  The kitchen is always the hub of the action during dinner parties but it can be the eye of the storm during Thanksgiving.  If possible, avoid setting up tables right next to areas that you will need to be doing all your last-minute prep and cooking.  Setting a buffet table in another room, can make it more comfortable for you to work and for your guests to have ample room to move.  Also, after dinner, the kitchen will inevitably look pretty messy, so it is best to have the fun in another room anyway.  It’s more relaxing to be in a room separate from stacked dishes.

5.  Have a schedule.

5 Tips When Hosting Thanksgiving for the First Time

This should be number 1 and it’s my favorite tip for people hosting Thanksgiving for the first or fifteenth time.  I write down a schedule, counting backwards on when I want to serve dinner, that has a ridiculous amount of detail as to when to put things in the oven, when to remove them, when to serve water in the water glasses, when to set the coffee maker, turn on the candles, everything.  This timeline will take you a while to put together but it will keep you so calm that it will become indispensable.  Also, you can use the same timeline year after year.  No more stressing wondering if you are forgetting something important.  There are just too many things to juggle on that day and winging it won’t carve cut it.

Above all, know that are these tips are geared towards one goal – you having fun!  Yes, it’s also about your guests, but they won’t have fun if you look stressed out.  When you are the host/hostess, you set the pace.  If you are relaxed, they will be relaxed and have fun, too!


Filed Under: Fall, Thanksgiving, Uncategorized · Tagged: Organizing Thanksgiving, Thanksgiving

Fall Home Tour

November 20, 2016 · by Maria · 2 Comments

Last week, I shared my Thanksgiving Table (Thanksgiving is in 4 days – Ahhh!) and I also slipped a little “fall” into the rest of our home and I promised that I would share those pictures, too.

Starting with our living room, below.  This is a no-one-sits-there-room and therefore the couch has managed to be this color for years.  It’s not that the boys aren’t allowed to sit here, it’s just that we rarely do, because all the fun is in the family room.  The only thing that I added here was the throw and the pillow, which usually resides in our master bedroom.  I also changed out the greenery in the tall gold vase for some brown and orange stems.  The gold vase was originally an inexpensive IKEA vase that I spray painted.  Remember my post about the year that I spray painted everything, except the kids?  I still love spray paint, but with a little more restraint.


Fall Home Tour

This is the opposite side of the room.  Only an orange lumbar pillow and a little “give thanks” pillow that I picked up last year at Target, from their dollar section.  Guess what?  I haven’t been to Target in months.  Crazy, right?!  No spray paint and no Target – who am I??

Fall Home Tour

Isn’t this the sweetest little pillow?  I vacuum pack all these holiday pillows and store them in the garage.  The solid ones I rotate from room to room.

Fall Home Tour

Here is the biggest couch in the world, our couch.  We have a love-hate relationship with it.   We love the size but would love for it to offer more support, hence all the pillows.

Fall Home Tour


Fall Home Tour

The pumpkin pillow was gifted to me and the others I already had.  Remember that striped throw?  I posted about it in my fall porch post, a few years ago.  It’s still just as soft and vibrant.

Fall Home Tour

Fall Home Tour

As you can see, a little goes a long way with decorating, if you sprinkle vibrant pops of color here and there.  My boys like to decorate early for Christmas (right after Thanksgiving) so I don’t like to take out too many fall decorations, that I will have to store in a few weeks.  Especially with ALL the Christmas decorations that are waiting patiently in boxes in the garage.  My back hurts thinking about it.

I will still try to squeeze in one more post with Thanksgiving tips.  I know, I have to hurry!  Either way, enjoy your Thanksgiving week!  I am super grateful for all of you!


Filed Under: Decorate, Fall, Living Room, Thanksgiving, Uncategorized · Tagged: autumn, Fall, Organizing Thanksgiving, Thanksgiving

Couchgating and the Best Roasted Salsa Recipe

November 19, 2016 · by Maria · 4 Comments

Along with Autumn comes football and along with football comes food, games and fun!  This week, I am partnering up with my friends at Wayfair, to bring you the best of tailgating at home, otherwise known as Couchgating!

couchgating-02


As a family, we have gone all out for football parties and sometimes we only go so far as to open up a bag of chips.  When you do want to go all out, it’s important to have the right tools at hand, to make your day as fun as it is easy.

This was our set up last year.

Couchgating and the Best Roasted Salsa Recipe

As you know I am usually not for buying entertaining items that are specific to an event, that way you can use them year-round.  When you look at the picture above, the only thing overtly “football” about the food table, was my sons toy football.  Somehow it still looks like a game day spread because of the colors I chose and one small accent.

Below are some of my favorite picks from Wayfair for a successful couchgating party!  All of these items are versatile for all kids of entertaining.

  1.  Frozen drink machine – Granted, I don’t actually own one, but I want one.  If you have more than a few people over, I’m sure it would avoid making individual drinks with the blender.
  2. Serving platter set – I found a couple of cute football shaped platters but in the end, I always choose the ever-versatile white platter.
  3. The couch – I know this is pretty obvious, but it’s crucial for being able to sit around for hours, and if you are like us, we all end up lying around the couch.  That’s one of the perks of having a huge couch.  On another note, although my couch is big, we are not super happy with how comfortable it is, so we end up using a bunch of pillows to add support.  Don’t be afraid to buy a couch from a trusted website, where you can also read reviews.  I purchased mine at a store and I’m sure that had I seen reviews, I would’ve chosen differently.
  4. The grill –  This simple round grill is still my favorite.
  5. Serving cart – Another one that I don’t own but have wanted for years.  Geez, I wish my husband read my blog!  So many gift ideas!  Actually, maybe that’s why he doesn’t. 🙂 )  A serving cart can bring the party to you.  It’s great if you are moving the party outside, or if you want to bring a few of the items from the big table, closer to you.
  6. Grilling tools and utensils –  I know that there are some awesome grilling sets available, but there is no tool that I prefer over a good ol’ pair of tongs.  That goes for indoor cooking as well, just a shorter length.


frozen-drink-machine                       serving-platter-set

Frozen Drink Machine                       platter-set


awesome-couch        awesome-grill

couch-wayfair    Grill


Serving Cart         grill-utensils-tools

Bar cart           Grilling tongs


One more thing!  I wanted to share with you my roasted salsa recipe which is perfect for your couchgating party.  Perfect for anything, really.  It’s my favorite and I have tried so many salsa recipes!

Couchgating and the Best Roasted Salsa Recipe

Roasted Salsa Recipe

Ingredients:

20 tomatoes (Roma tomatoes)

7 jalapeños

2 onions

7 garlic cloves

1 large bunch of cilantro

1-2 tablespoons of salt (depending on the size of tomatoes)


Directions:

Pre-heat the oven to 375.

Cut up the tomatoes and onions into large chunks and spread onto a baking sheet pan.  Remove the caps off the jalapeños, then cut the jalapeños lengthwise, and remove the stem and some of the seeds (read tip below).  Add the 7 whole cloves of garlic.  Toss everything onto 2 sheet pans.

Heat tip: In order to keep the heat off your hands, you may want to wear gloves when cutting up the jalapeños.  For really hot salsa, do not remove the seeds of the jalapeños.  For medium-hot salsa remove the seeds from half of the jalapeños.  For medium salsa, remove all the seeds from the jalapeños.  For mild salsa, hold the jalapeños under running water and remove the seeds and inside membrane of the jalapeño.   

Couchgating and the Best Roasted Salsa Recipe


Place the trays in the oven and roast for about an hour.  Check the trays after 45 minutes, so that the roasted tomato mixture does not burn.  You should see a bit of char on the edges of the onions or tomatoes, but nothing should look like it’s burning.

Remove the trays from the oven and allow to cool slightly.  When you can handle the contents, place them in a bowl and take them over to your food processor.  I suggest you do the following in 2 or 3 batches to avoid over filling the processor.

Place a good amount of the roasted tomato, onion, jalapeno and garlic mix into the processor, I then add a small bunch of cilantro and a bit of the salt.  Process until desired consistency and then add to a large bowl or container.  Continue to do this in batches until you have used all the roasted mixture and the cilantro bunch (and the salt to taste).

Couchgating and the Best Roasted Salsa Recipe

This makes about 4-5 large jars depending on the size of the tomatoes you use and the jars, of course.  I like to use a canning funnel for this because it makes pouring easier.  The salsa will still be somewhat hot at this point so be careful.

Nothing left to do but, enjoy!

Couchgating and the Best Roasted Salsa Recipe

I hope your team wins!  Either way, enjoy your couchgating day!

Filed Under: Recipes, Sponsored, Uncategorized · Tagged: entertaining, football, tailgating, wayfair

Fall Buffet Decorating

November 9, 2016 · by Maria · Leave a Comment

Last year I posted pictures of how I decorated my buffet for fall.  I called it a mantel and really, it isn’t.  It’s a buffet that is in the entrance of my home that I decorate as one would a mantel, except I live in Miami and fireplaces are not popular, because we have enough heat as it is.  I do love having this big piece of furniture that I have had for 13 years, because it gives me beaucoup storage and an opportunity to set the stage for the current season.

Fall Buffet Decorating

This will be a short post because there is not much that goes into putting this together.  A few days ago, I shared how I decorated my table for Thanksgiving this year.  Since this room borders the dining room, I like to sprinkle a little fall throughout, tying together both rooms.

There were two new items that I was excited to use this year.  One was this sweet little “Harvest Blessings” sign that I picked up at Ross for 6.99 (crazy, right?!) and the white pumpkins that spell out FAMILY.  With very little money, you can pick up something similar at Ross or Homegoods and add a little autumn feel to your home.

Fall Buffet Decorating

I purchased the leaf garland that you see intertwined on the buffet through Amazon.  I actually purchased it with the intention of using it on my Thanksgiving food buffet but I figured it can adorn this table for now.  Also, chances are I will tuck it away and when the Thanksgiving frenzy begins, I won’t even remember where I put it.  It looks really nice at night, when the lights are on.

(I added the affiliate link above for the garland but it is not currently available, maybe it will come back in stock or you can find something similar on Amazon or elsewhere.) 

Fall Buffet Decorating

The wreath on the mirror was already there from the last season – lazy decorating, I know.  Hey, maybe I can glue some red berries on it and leave it there for Christmas!?  Now that’s an idea!

Fall Buffet Decorating

In a few days I will show you what I did with the family room and living room (opposite to this furniture piece) and I think you will like it.  Think vibrant pops of orange!  See you in a few days!  Harvest Blessings, friends!

Filed Under: Fall, Living Room, Thanksgiving, Uncategorized · Tagged: Fall, Fall Decor, fall decorating, Fall Mantel, Thanksgiving

Elegant Fall Tablescape

November 4, 2016 · by Maria · 4 Comments

Hello friends!  Missed me?  I’ve missed you, but it’s been so hectic around here that I had to take a small blogging break or start posting for the sake of posting, which is never what I wanted to do.  So I took a break and it was great and it was needed.  Sometimes we just need a little break from things so that we can later re-connect with renewed energy and ideas.  Blogging can be so much fun and so much work but it’s incredibly rewarding and that’s why bloggers pull up to their keyboards time and time again.  Thank you to my  Graceful Order friends for sticking with me for the last 3 years, for all the likes and all the shares and all the sweet comments – thank you!

I actually only meant to be away for the summer as my boys were home but then August came around and then September and as I was bringing down the autumn stuff from my garage, I thought “I need to share this with my friends!”  Then I started photographing and it was so much fun again!  Throughout this week I will be sharing posts about Autumn.  Expect lots of orange and brown and pumpkins and pie!

I will start with one of my favorite things to do which is decorating the table!

Elegant Fall Tablescape

I am hosting Thanksgiving dinner this year and I intend to leave the table set like this for the remainder of the month.  No fear, I will wash the dishes so that no one is eating dusty turkey!   I am using these gorgeous dishes that I picked up last year at Williams-Sonoma in their after Thanksgiving sale.  I ordered some online and when they ran out, I drove to the store to pick up the rest.  I did pick up a few extras just in case one breaks, the set doesn’t fall apart.  By the way, should that happen, you can always set the two end place settings in a solid coordinating color.

Elegant Fall Tablescape

I love having a large table.  Well, usually I love it.  One challenge that I have is finding a tablecloth that will fit.  I have priced out getting one custom-made and they are so expensive!  A quick search on Amazon led me to this tablecloth, which has the right length and width for my table – 70 x 144.  In the past, even when I can find a tablecloth that is 144 in long. it was usually 60 in wide, which leaves the side of my table short on fabric.  This one was perfect.

Elegant Fall Tablescape

The centerpiece is a swag that is meant to hang on a wall.  I just placed some gourds around it to make it feel full and bountiful – just as Thanksgiving should be.

Elegant Fall Tablescape

I also placed some faux candles on the table.  That way I don’t have to worry about any scents competing with the food or any candles dripping on the table.  These candles are the most realistic I have found to date.  I have quite a few of them throughout my home.  They are perfect for mantles and hard to reach areas where it’s a pain to light a candle; they are safer, too.

Elegant Fall Tablescape

As a finishing touch are the mini pumpkin bowls which I will use to serve butternut squash soup for Thanksgiving dinner.  I have seen a few version of these bowls and they are all adorable.  Just make sure that they are oven-safe so that you can keep soup warm in the oven, while you do last-minute things, before dinner is served.

Elegant Fall Tablescape

I hope you love how the table turned out.  I love that I get to enjoy it all month and not just for Thanksgiving.  I would love to know how you decorate your table.  What colors do you decorate your home with during the fall season?  Browns, oranges or more shabby chic with white and ivory shades?

See you all in a few days when I share fall decorated living room!  It’s nice to be back!


Filed Under: Decorate, Fall, Thanksgiving, Uncategorized · Tagged: autumn, Fall, fall decorating, Thanksgiving, Thanksgiving Table, thanksgiving table setting

GREATER Movie

August 15, 2016 · by Maria · 1 Comment


GREATER Movie

Summer is coming to a close and I can’t wait for the boys to go back to school we had so much fun these last few weekends!  We took a few mini vacations this Summer, visiting the Florida Keys a few times and the Georgia Mountains.  We love creating memories with our boys and the Summer is the perfect time for some good, uninterrupted family time.  We got back from the Blue Ridge mountains this past weekend and we were so tired – by “we” I mean my husband and myself.  We drove from Miami to Georgia with both boys and my parents and when we got home, all I wanted to do were two things, sit on the couch and – actually that was it.  Sit on the couch.

Before leaving on our road trip I was given the opportunity to pre-screen a movie that is coming to theaters August 26th called, GREATER.  I was looking forward to coming home and watching the movie, especially after seeing the preview.  I was also looking forward to doing anything that didn’t involve driving and refereeing 2 boys in the back seat – it’s a 12 hour drive, ya know.  What I wasn’t expecting is to love the movie the way I did, and I will tell you why without spoiling it for you.  At first glance the movie was about football but really the movie is about life and is relevant to anyone and at any age.  I knew my husband would like it because he used to play football in high school and he gravitates towards sports-related movies.  We initially watched the pre-screen in our office on my computer.

GREATER Movie

After we watched it, we knew that we had to let our 12-year-old see it, too.  We connected my computer to the television and we all saw it there again, together.

GREATER Movie

So what’s so special about GREATER?  It’s a movie based on a true story about the life of Brandon Burlsworth, who was possibly the greatest walk-on in the history of college football.  However, Brandon was not always the “greatest” and actually many times he was told he was the worst and would never make it and yet he had faith and persevered.  He had faith even when the very people that loved him most thought he should be more realistic and let go of his dream, he didn’t give up trying.

GREATER Movie


He had listened to this message of moving on and having more realistic expectations of himself since he was a boy.   He endured so much discouragement and while many would have given up and settled for a more realistic, more expected future, he didn’t.  Through faith and discipline, the kid dared to keep believing in his dream to play college football for the Arkansas Razorbacks.  It wasn’t just belief, not faith alone, he put in endless hours of practice and sweat, until he reached his goal.  If he was told that he was less than the others, he just worked harder than the others and in the end he led them all – peers and elders alike.

GREATER Movie

This is the kind of movie that I want my kids to watch.  This is the kind of humble audacity that I want them to have.  To dream is not enough, but it is the beginning.  Seeing how this young boy, against all odds, worked so incredibly hard, and he won and then he lost and then he won again…but he never stopped.

I don’t usually write about movies, but I wanted to share this with you and encourage you to go watch this great movie with an awesome message.  Determination, hard work and passion are the makings of an incredible legacy and that’s what this young man left behind.  GREATER has a release date of August 26th and you can check your local theaters for availability – it’s worth it.

GREATER Movie

This post is part of a social shopper marketing insight campaign with Pollinate Media Group® and GREATER Productions. but all my opinions are my own. #pmedia #GREATERMovie #GreaterTheMovie  http://my-disclosur.es/OBsstV

Filed Under: Sponsored, Summer, Uncategorized · Tagged: greater the movie trailer, Inspirational movie

Summer Camp Lunches Made Easy

June 22, 2016 · by Maria · Leave a Comment

This is a sponsored conversation written by me on behalf of Mott’s®. The opinions and text are all mine. #MottsMovieBonus

Summer Camp Lunches Made Easy

My boys have one week left of school, just one more week!  They are looking forward to summer and frankly, so am I.  I may be singing a different tune come August but for now I welcome the more relaxed schedule for them.  My schedule however, doesn’t change all that much because it’s summer time so I have to adjust a bit to keep things working smoothly here at Casa Gonzalez.
One big difference that happens in the summer is that both my boys will be taking their lunches to camp daily.  My oldest (12 years old) usually eats at the cafeteria during the school year, but once he enters camp, he will be taking his lunch with him daily.  My youngest (5 years old) always takes either lunch or a snack to school.  He is the kind that if he doesn’t like his school lunch, he won’t eat until I pick him up, so a heavy snack is necessary.  Since I am already thinking of different lunches to send my boys off with, I have partnered with one of my favorite snack companies – Mott’s® – to bring you summer lunch ideas for kids!

Summer Camp Lunches Made Easy

The Mott’s Apple Juices are a treat for my boys.  I want them to make smart snacking choices and there is no better time to learn than when you are young.

Summer Camp Lunches Made Easy

There are a lot of options for lunch or snacks that are fun and nutritious.  My kids like crunchy things, (I think we all do) so I like to add a few veggie chips to their lunches.  Mott’s Apple Juice and Mott’s Applesauce are a staple in their lunch boxes.  I usually buy them the original flavors but there are applesauces in various other choices, such as Mott’s Apple Cherry which is a new flavor.  Also, fresh fruit, cheese sticks, yogurt… so many options so that they don’t get bored with lunch.

Summer Camp Lunches Made Easy

And the trick to lunches made easy?  Having a stocked refrigerator.  I tell my boys which are their snacks for home and which are for camp.  They know that the deli drawer is my camp stash.

Summer Camp Lunches Made Easy

Most of the time, their lunches look like this.  That little sandwich that you saw in the picture above, is a Cuban Medianoche.  Do not fear, I will translate.  Medianoche means midnight and these sandwiches became popular in Cuba many moons ago when they were traditionally served as a midnight snack in restaurants.  This is an adaptation on the sandwich because they are made with fresh roasted pork and are finished off on a press…yum!

But we are keeping it easy over here – it’s the summer after all!  I just make the sandwiches with a sweet Hawaiian bread roll, a slather of mayo or mustard (or both), roasted ham, roasted pork (or even turkey, if you want), swiss cheese and a pickle.  Voila – Mini Medianoche!

Summer Camp Lunches Made Easy

I want to teach my boys about eating smart now that they are little.  My boys don’t like every vegetable or fruit, so I just find the ones that they like and I alternate them in their lunch bag.  The most important tip is definitely to keep your pantry or refrigerator stocked and organized so that in the morning, before the coffee has taken effect, you can quickly throw together a delicious summer lunch for the kids.  A finishing touch is a little note that I add to my 5 year old’s bag.  If I did this to my 12-year-old, there would be consequences to pay.  🙂

Summer Camp Lunches Made Easy

One more thing!  There is a super cool offer that you can take advantage of – I did!  I found all of the products in this post, sans the lunch bag 🙂 , at Walmart and I was sure to keep my receipt.  Why?  Check out the offer details below:

Summer Camp Lunches Made Easy

You will notice that the products have The Secret Life of Pets characters on packaging.

  • Purchase any 3 Mott’s Juices or Applesauces to Receive a Free Childs Ticket (Mott’s on pack offer) for The Secret Life of Pets
  • Purchase any 5 Mott’s Juices or Applesauces to Receive an additional $8 movie voucher  Note: Offers can be stacked – Purchases of 5 are eligible to receive the Free Childs Ticket as well as the $8 movie voucher

It’s really easy to do…below is a screenshot of when I did it.

Summer Camp Lunches Made Easy

If you want more details of either promotion, you can click here :

  • Purchase 3 Offer Redemption
  • Purchase 3 Offer Details
  • Purchase 5 Offer Redemption
  • Purchase 5 Offer Details

I hope you all enjoy your summer.  The school year went by so quickly and I think summer will too.  Enjoy every minute of it, snack wisely and stay safe!


Filed Under: Kitchen, Sponsored, Uncategorized · Tagged: Kids, lunch, Refrigerator

Why Didn’t I Think of This Sooner?

June 1, 2016 · by Maria · 11 Comments

Why Didn’t I Think of This Sooner?

I use the back of cabinets doors for so many things!  It’s one of my favorite storage ideas and an easy opportunity to overlook.  Today I am partnering with Wayfair to share with you some of my favorites.  The ones that left me thinking “Why Didn’t I Think of This Sooner?”

Using the back of cabinet doors in The Kitchen –

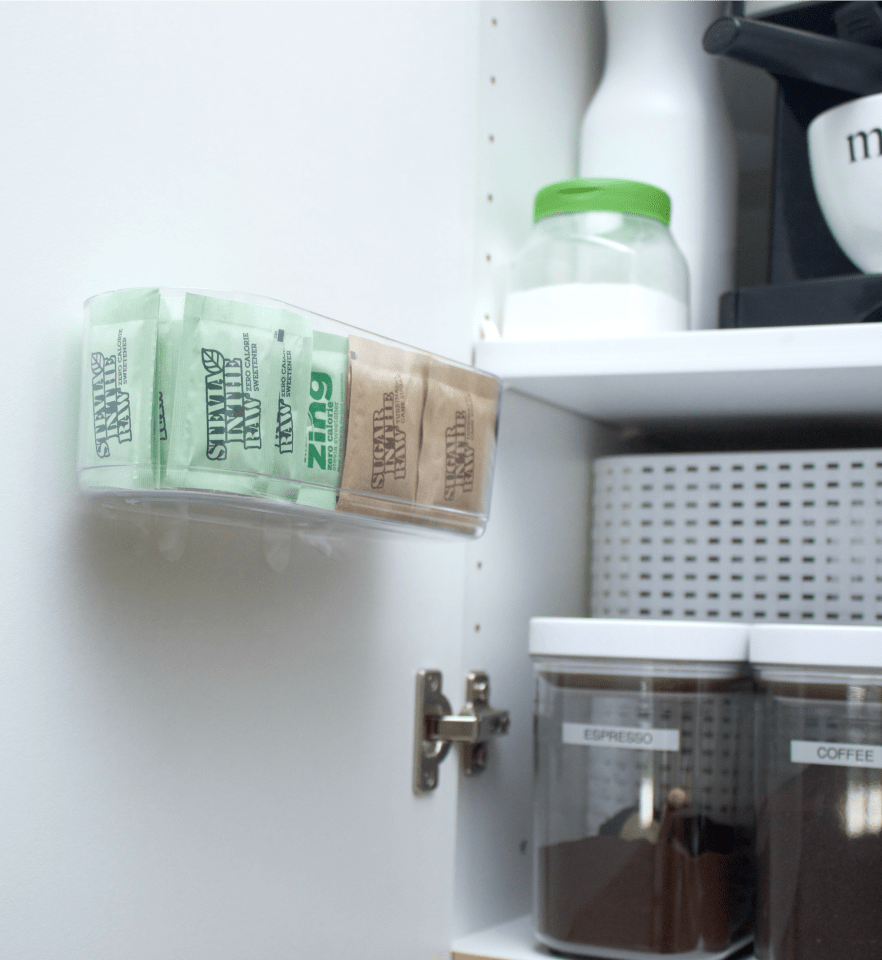
There are so many uses in the kitchen for back of the cabinet organization!  I use these awesome adhesive bins that come in all shapes and sizes to customize my space.  I store sponges, storage bags, a set of spoons designated for coffee…so many options.

I use the back of the cabinet for my coffee station.  I love having spoons, honey and sugar packets accessible while I prepare my morning coffee or tea.  I do try to store items that are not too heavy, so that I don’t have to worry about them coming off the wall.

Why Didn’t I Think of This Sooner?

I also use the back of the cabinet door in my smoothie station to hold up a clipboard with clippings of recipes.  This clipboard is from the dollar, store which is great because it isn’t heavy at all.  I didn’t want some great quality, substantial board for this.  I love being able to place clippings from magazines or recipes that I want to try.  If they were in a drawer, I would surely forget about them.

Why Didn’t I Think of This Sooner?


Using the back of cabinet doors in the bathroom –

Similar to the kitchen, the bathroom usually has cabinets that offer an opportunity for great storage.  The area under the sink can be tricky because you always have to work around the plumbing.  The back of the cabinet can be a great opportunity to make up for that lost space.

Why Didn’t I Think of This Sooner?

I love this little cabinet in my bathroom.  Honestly, I am not even sure what it was designed to be used for, but I use it to store my makeup.  It already had built-in storage which is fantastic and I added some extra bins to the back of the cabinet to make it even more useful.  Since the back of the door is magnetic, I also added a magnet to the back of my hair brush.  This slender cabinet is beside the bathroom door and barely visible when closed.

Why Didn’t I Think of This Sooner?

These are just a few ideas that have worked for me!  The more cabinets that you have, the more options you have.  I wouldn’t want to fill up all my cabinet doors with storage but I do think that in a select few, it can be a really great solution.

I hope these ideas inspired you to look at your own home and especially your cabinets, as an opportunity for more smart storage.  Be sure to measure your space so that you purchase the right size bins.  Also, make sure that the new bins won’t crash with what is already inside the cabinet when you close it.   As I mentioned above, I recommend storing items that are not heavy so that you don’t have to worry about anything tumbling down.  Follow the instructions on the adhesive bins and allow them to dry and adhere before adding anything to the bin.

I promise when you find a the perfect cabinet to transform, you will wonder – Why Didn’t I Think of This Sooner?

Why Didn’t I Think of This Sooner?


Filed Under: Bathrooms, Kitchen, Uncategorized · Tagged: bathroom organization, Organization, organizing kitchen cabinets

Keeping Laundry Under Control

April 8, 2016 · by Maria · 4 Comments

This shop has been compensated by Collective Bias, Inc. and its advertiser. All opinions are mine alone. #allfreeclear #CollectiveBias

Keeping Laundry Under Control

Do you ever feel like you are drowning in laundry?  I know that with 2 boys, a husband plus myself I feel like I am never done with our laundry.  Over the years I have tried different systems to see which felt more manageable and I want to share with you what works best for me.  Yes, I still do laundry often but rarely do I feel like it’s out of control.  Of course there are the exceptions like when we go on vacation or someone isn’t feeling well, especially if that someone is me. 🙂

What works for me may not be what works for you.  It is important to take into account work schedules and personal preference.  Some people prefer to pick a laundry day and get it all done in one day.  I prefer to do a load a day and sometimes, especially on the weekends, I will skip a day.  I find that this method works best for me and it doesn’t allow laundry to accumulate.  I will place a load in the washer in the morning and I will complete that entire load, meaning washing, drying, folding and putting away.  I resist the urge to put another load in the washer because I know that I won’t have time to complete a second load, meaning it would stay in the washer or dryer waiting for me.  I prefer to finish one load in it’s entirety.

Also, I use one detergent for the entire family.  Although detergent can’t treat or prevent allergies, I do have one son whose skin can be sensitive, so I choose the same hypoallergenic detergent for all of us – all® free clear detergent is 100% free of perfumes and dyes of any kind.

Here are my tips for keeping laundry under control:

1.  Keep it pretty

This may sound silly because laundry is laundry, right?  Well, I find that if I am doing laundry in a neat and cute space, I am more likely to want to do it.  At the very least, it makes a mundane task more pleasant.  Organizing doesn’t have to be expensive.  I used the same type of plastic baskets to organize my laundry room and I placed a metal label on each one naming the contents.

You can’t tell in the picture but this laundry closet is in a dark area of the house.  With the green walls and the bright white bins, laundry time is not dreaded.

Keeping Laundry Under Control

2.  Keep it practical

Just because the area is pretty, doesn’t mean that usefulness goes out the window.  If you have a bunch of little items for stain removal, consider placing them all inside a canister so that the laundry room remains organized.  Also, one of my favorite tips is to add a little trash can for disposing of lint.

Keeping Laundry Under Control

3.  Maximize your space

I wish I had a large laundry room but instead I have a closet.  I have used all the vertical space on the side walls to add function and to decorate my space.  Here is a book about housekeeping tips, including laundry tips.  You will also notice a pair of scissors and a little bucket (from the dollar section) with clothespins.  The other metal piece is part of a clothesline that I sometimes use inside the closet.  I mean it when I say that I use every inch!

Keeping Laundry Under Control

4.  Separate laundry by colors but not as much as you think

I would not wash a white shirt with a red pair of pants.  However, if an item has been washed many times and does not bleed, colors can easily be included in the same load as lighter colors – maybe not white, but you get the idea.  The only item that I like to wash completely on their own are towels.  Because of their texture I notice that they can make clothing pill faster.

Also, if you have the space, consider placing 2 hampers in each bedroom so that everyone can already keep their clothing sorted, which makes washing easier.

Keeping Laundry Under Control

I purchased this large container of all® free clear detergent at Sam’s Club because it is such a good value!  However, I will probably transfer the detergent to a smaller container for ease of use.

Keeping Laundry Under Control

This will last us over a month!

Keeping Laundry Under Control

Of course if you use it this way, it is also convenient.  I do follow the directions for use on the packaging as to not over use the product by putting too much product in one load.

A little tip –  this detergent also comes in the form of all® free clear Mighty Pacs®.  If you follow my Instagram, you know that a couple of weeks ago we stayed in a cabin in NC.  They had a washer and dryer in the cabin and I took a few of the pacs with me.  I was able to do laundry everyday and basically came back home with a suitcase full of clean clothes.  Pretty. Awesome.

Keeping Laundry Under Control

5. Maintain your space with a little Spring Cleaning

Although your laundry room’s primary role is to clean items, it can get pretty dirty.   Extend the spring cleaning into the laundry area.  Detergent bottles get full of residue, as do the trays that hold them.  Canisters gather dust.   The washer and dryer also get dirty.  It is important to keep the washer clean so that it keeps doing a good job keeping the family’s gear in top shape.

There are lots of other tips that I can share with you (and I will very soon) but these are the top 5.  We all have to do laundry and the task is never 100% complete (well, maybe for 10 minutes or so) – why not make a space that gets so much use both pretty and functional?  Do you have any laundry tips that you can share with me?  Are you a “laundry day” kind of person or “a-load-a-day” like me?

For more ideas and laundry tips, you can visit the laundry hub here. 


Filed Under: Clean, Laundry, Uncategorized · Tagged: Laundry, Laundry Closet, laundry tips

The Ultimate Coffee Station

March 30, 2016 · by Maria · 6 Comments

The Ultimate Coffee Station

You know those days that you wake up so wired and alert that the last thing on your mind is coffee?

Yeah, neither do I.

The first thing I did when we moved into this house (12+ years ago) was put together the coffee cabinet.  It has changed a little, but many things have remained in the same exact spot.  You know a system works for your family when it remains fairly well maintained.  I am not including kid rooms in that statement.  🙂

The Ultimate Coffee Station

For as much as I like entertaining and cooking, I consider my kitchen to be on the small side.  It doesn’t appear that way at first glance but when you consider that a lot of the cabinetry is for pantry items, not much is left for all my other kitchen needs.  I really have tried to use every inch of that kitchen (without it looking too busy) in order to house my many cups, mugs and dishes.


The Ultimate Coffee Station

One of the ideas that I love is using the cabinet doors as a place to store small items.  I purchased this large adhesive bin to hold larger items like agave or honey and also these two stainless steel shakers that I use for cinnamon and cocoa.  I chose those specific shakers because they come with a plastic lid to cover the sifter top.

In the middle is a smaller bin that holds sugar packets.  Below that are a few smaller ones that hold the spoons that stir our coffee in the morning. the cappuccino spoons and a few essential oils.  Many people may not need spoons in their coffee station because they may have a utensil drawer nearby.  In our case, our utensil drawer is across the kitchen.  I purchased a set of spoons at Homegoods and dedicated them to this spot.  No more walking across the kitchen in the morning just to get a spoon.  Maybe this isn’t a big deal but considering that we are half asleep when preparing our coffee, I’ll take the convenience.

The Ultimate Coffee Station

On the other side of the cabinet I place my cappuccino maker which I don’t use as often as my coffee maker – that one stays on the counter at all times.  Next to it is powdered creamer which I rarely use but I like to have it on hand, just in case my guests request it.  You may notice that I removed the wrapper and it looks like a plain white container.  This little step may seem silly but keeping your cabinet as monochromatic as possible, makes it look less busy.  That big label was red and yellow and now it’s just white and disappears into the cabinet.  In front of it you may recognize that plastic container.  It was a sweetener and I removed the label on that as well.

I used white plastic shelves throughout the cabinet which allowed me to double up on storage for my plates and various cups.

The Ultimate Coffee Station

Then I have my two coffee containers that are really easy to access and to open and close.

The Ultimate Coffee Station

I keep a coffee measuring spoon inside each container.

The Ultimate Coffee Station

Behind the coffee you will see two woven plastic bins.  There I keep extra coffee and frothing pitchers.  These items are all concealed inside those 2 stackable bins that I found at Target.

The Ultimate Coffee Station

On the other side of the cabinet I have another adhesive bin for more sugars.  You should make sure that these bins will have enough clearance when the cabinet closes.  In this case, if they were any lower they would crash against the coffee containers.  I measured mine to fit above the canisters when the cabinet closes.

The Ultimate Coffee Station

Right in the middle are my vitamins.  I chose this stainless double tier turntable to hold all of our bottles.  Be sure to measure your cabinet to make sure the items will have enough clearance.  I have tried so many places to store our vitamins but if they are not in front of our face when we make our coffee, we forget them.  Sometimes we still forget them.

The Ultimate Coffee Station

In the very top there is a casserole set that I rarely use and that is why it’s so high up.  Of course there are many different kinds of coffee mugs in the cabinet but the big ones in the very bottom are the ones we use daily.  We keep our coffee maker next to this cabinet (besides the knife).

The Ultimate Coffee Station

This system has worked so well for us.   I can tell you that besides some minor touch ups, I didn’t have to do much to the coffee station to get it photo ready for this post.  It pretty much stays looking like that.

You can customize an are of your own and even add flavored syrups with pumps, just like the fancy baristas have.  You can add your touches to make it perfect for you!  So are you a coffee or tea lover?  How many cups a day?  As much as we love coffee, we only have one.  Also, do you have an area already dedicated to coffee items?

I love you a latte!

I have tried to link as many items in this post to their source, just in case you are interested.  There are some Amazon links included which means that I get a small portion of the sale.  However, you do not pay more because you purchase through the link.  I wouldn’t do that to ya!  Thank you for your support!  


Filed Under: Kitchen, Top Navigation, Uncategorized · Tagged: Coffee, Coffee Bar, Coffee station, Kitchen Organization

Set Your Easter Table

March 23, 2016 · by Maria · 2 Comments

Set Your Easter Table

You know how I have always told you that I like to buy neutral pieces that are not particular to any one holiday?  That way the pieces are versatile enough to use year-round?  That was true until these little bunny plates went on sale.  My resolve and practical good sense went out the window.

The dinner plate version was also available, but I told myself that these salad plates would take up less room to store.  That was me easing my conscience. 🙂

Set Your Easter Table

I am so glad that I picked them up!  I purchased 9 of them, as I usually buy an extra plate just in case somebunny breaks one.

Set Your Easter Table

I found the plates and the tablecloth at Homegoods.  The tablecloth could use a few more inches all the way around and I am thinking about adding a green border all around the tablecloth, so that it feels more sizable.  Tablecloths and comforters should be made a little larger than they currently are.  Don’t you agree?

Set Your Easter Table

I have had my eye on these gold utensils for over a year!  Finally they went on sale last year (after Christmas) and I purchased 2 sets.  I was also considering this one from Amazon but decided on these from CB2.  I love them and the only critique that I have is the size of the little fork – it is unusually small.  Maybe it would be perfect as an appetizer fork, but kind of small for salad.

Set Your Easter Table

There was a lot of color already on the table, especially with the busy pattern of the tablecloth, so these linen napkins were my go-to.  I paired them with a simple gold napkin ring that matched the chargers and the utensils.

Set Your Easter Table

You all know how I love fresh flowers but I had this little yellow arrangement by my bed and it fit perfectly inside Mr. Bunny.  To make this more substantial, I sat him on a pretty blue cake pedestal.

Set Your Easter Table

I had these faux eggs in my kitchen.  Don’t they look real?  I placed them on these tiny bunny plates.  I also thought of filling them with jelly beans.

Set Your Easter Table

Flanking the yellow flowers are these two potted plants (not real).  I like how the pots even have some weathering, which make them more believable.  From far away all the greenery and flowers look real.

Set Your Easter Table

So will I be using this table for Easter?  I have no idea!  We have yet to really make plans but I am glad that the table is set and ready to go just in case we do some last minute hosting. #JustAddTheHam

Will you be hosting Easter at your home this year?  Is it a holiday that you decorate for?  All I do is set the table but not too much more decorating.  I would love to hear about your traditions on this special day.


This post includes one affiliate link from Amazon.  Purchasing through this affiliate link does not affect what you pay for the item.  Thank you for supporting Graceful Order!

Filed Under: Decorate, Dining Room, Easter, Spring, Uncategorized · Tagged: dining, Dining Room, Dining Room Decoration, easter, Easter Table, Formal, place setting

Living Room from Scratch with Wayfair

March 18, 2016 · by Maria · Leave a Comment

Living Room from Scratch with Wayfair

Hello Sweet Friends!  Besides the Tastemaker Awards post from yesterday, I have been a little MIA these past few weeks because everyone in my home came down with the flu…one-by-one.  We are all better now and I can’t wait to share with you some of the things that I have been working on.  To make it up to you I am sharing with you some real eye candy.

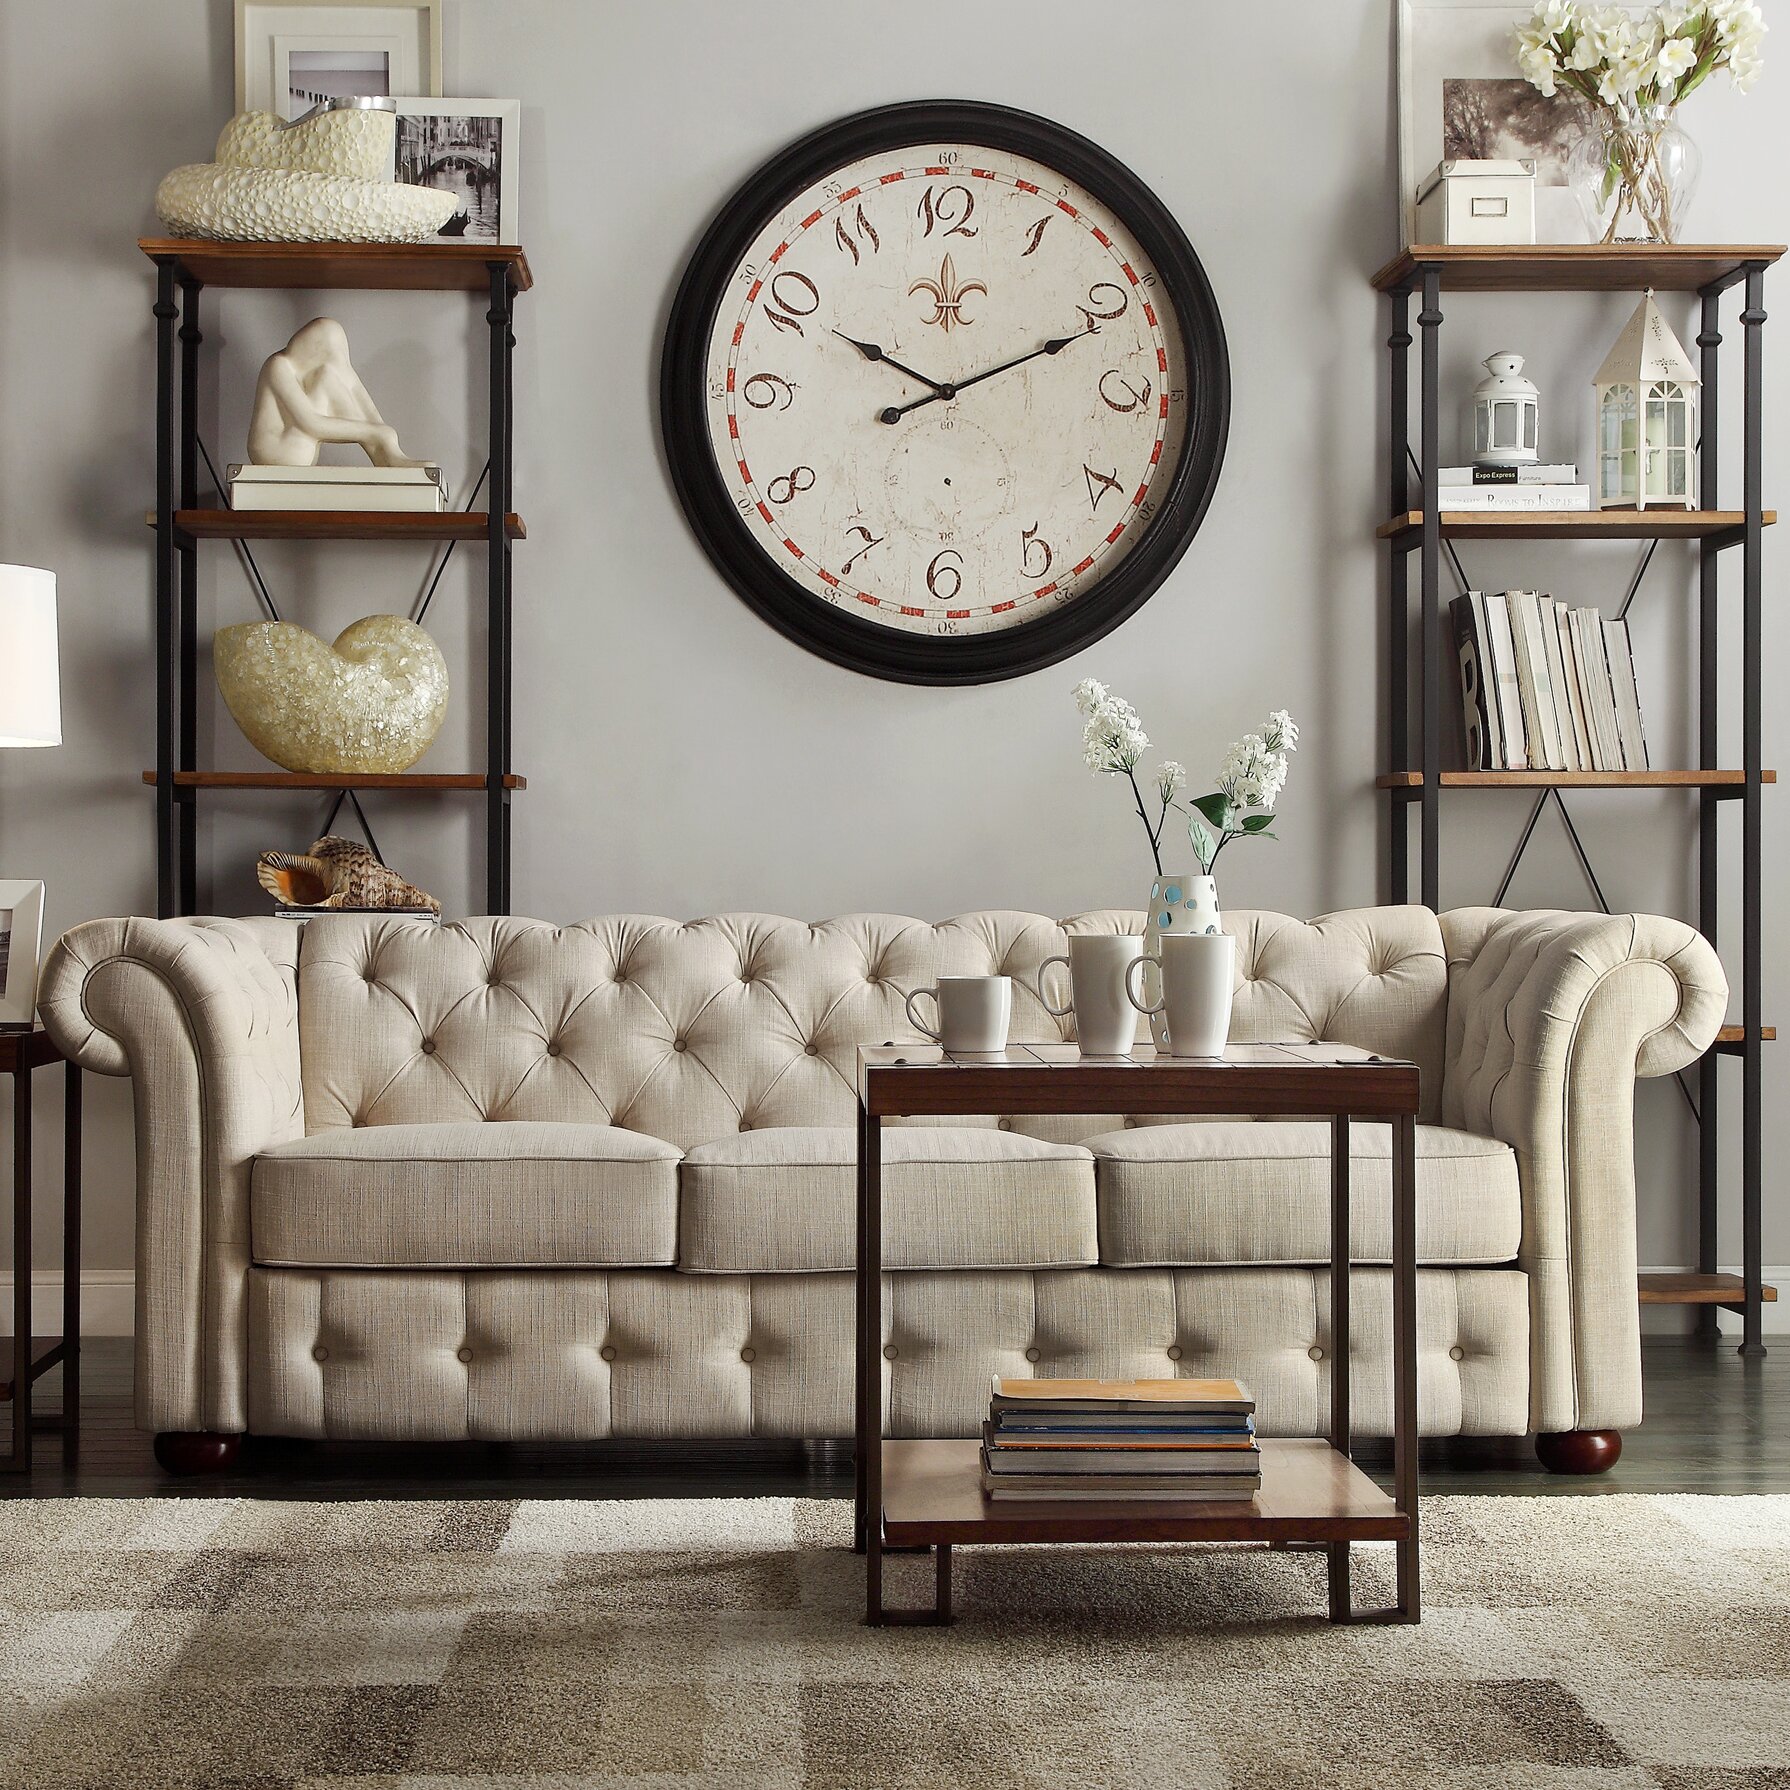
Move over George Clooney and enter beige tufted chesterfield style sofa!

Living Room from Scratch with Wayfair

So what’s with the sofa?  Well recently Wayfair reached out to me and asked if I would style a room from scratch and what pieces would I use.  I welcomed the challenge and below are my pics of the picks :-).  But before we dive in, I wanted to share with you the reason and perspective behind the pieces that I chose.

My favorite rooms are those that curate over time.  Those rooms have the most character, depth, interest and even practicality.  So when I chose the pieces from the Wayfair site, I didn’t want them to match perfectly – on the contrary.  Also, keep in mind that I am styling this room as a space that isn’t necessarily the one that gets the most use.  I say that because the couch is…well…probably not one that is the best choice for the kiddies.  My home has a family room that houses practical leather couches and a really small formal living room – that’s the one I thought of as inspiration when curating this space.

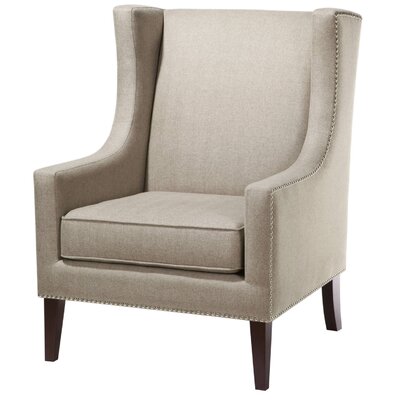
So like I said, the gorgeous couch above is already a linen color, and in my home I have 2 chairs facing the couch.  In this case, I would pair the couch with 2 of the chairs below (that are also available in linen) but I would choose a dark gray so they stand out a bit, but not too much.  We want our couch to be the star.  So how about this beauty?

Living Room from Scratch with Wayfair

I kept imagining a small living room (like mine) so I didn’t want too many colors in the room.  Not super match-ey but definitely not busy.  The rest of the pieces as you can see are fairly neutral and the “drama” piece, besides the couch, is the art piece.  It was available in multiple sizes but I would definitely go with the largest size that your wall can take.  One or two statement pieces in a room create the “designer” feel that we are after.  Everything else was the supporting cast.

Living Room from Scratch with Wayfair

If you are interested in “shopping the look” and getting more specifics on each item, you can click on the pictures below and you will be taken straight to items.  One of the things that I love about Wayfair is that you will immediately see a ton of options that fit within the same style of the item that you clicked on.


sofas
Carthusia Tufted Button Sofa – Beige
I love the low back, the rounded corners and the beautiful tufting throughout. I recommend pairing this couch with simple side chairs so that it can remain center stage.
Accent Chairs
Colette Chair – Charcoal Gray
I love how understated this chair is! It can complement almost any couch without competing with it.
”decorative
Eye-Catching Zebra Patterned Throw Pillow – Grey Beige
Adding a few gray and beige pillows to the couch will really bring together the two neutral colors that we are incorporating in our room design.
area rugs
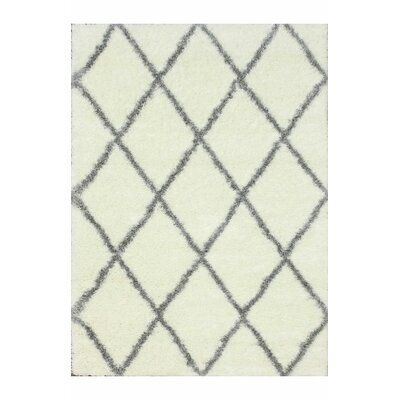
Gray & Off White Shag Area Rug
It’s no secret that nothing anchors a room like a good rug. I love a good shag rug and this one incorporates both off-white and gray. The diamond design and neutral background makes the rug interesting without being busy.
”coffee
Mallory Coffee Table
This mirrored top table has a beautiful satin nickel sweeping base and it’s the perfect addition to this room. I love how versatile this coffee table is – all that’s missing is a beautiful faux arrangement of peonies, a stack of books and pretty candle.
wall art
Gold Diamonds Faded Graphic Art on Canvas
A blank wall is an opportunity for a dramatic piece like this beautiful canvas of a gold chandelier! There are so many sizes available, but I would definitely go over-sized for this piece. It is absolutely gorgeous!

As you know, my living room sofa is a really light color like this one.  Admittedly, we usually hang out in the family room, so it gets very little use.  I’m glad I did it though.  It’s the first thing that you see walking into our home and I love it!  Would you ever place a linen color sofa in your home or does the light color scare you a bit?  What are your favorite pieces from the ones pictured above?

Let me know your thoughts on the room.  Next on the blog will be some ideas for Easter.  Yup, it’s around the corner.


Filed Under: Decorate, Living Room, Sponsored, Uncategorized · Tagged: living room, wayfair

Wayfair 2016 Trade Tastemaker Awards

March 17, 2016 · by Maria · 1 Comment

Remember last year when I shared about going on the Sailing with the Scotts HGTV cruise?  It was a blast and I hope they do it again this year.  Well aside from that, I don’t attend many events that I get invited to as a blogger, because they usually require travel and time away from the boys.  However, when there is a local event, I am there like a bear (not sure what that even means).  So this past weekend I attended the Wayfair Tastemaker Awards here in Miami and I had a great time!  It took place in a beautiful, historic South Beach hotel called the SLS Hotel.

Wayfair 2016 Trade Tastemaker Awards

We all gathered in the outdoor terrace part of the hotel which was beautiful, as you can see.  The picture does not do it justice.

Wayfair 2016 Trade Tastemaker Awards

We sat around, enjoyed drinks and delicious appetizers.  Seriously, the apps were so yummy that they are worth mentioning and even photographing but I forgot to.  There were dates wrapped in bacon, ceviche, gazpacho (I actually don’t like gazpacho but it looked good) and other little morsels of goodness.

Wayfair 2016 Trade Tastemaker Awards

I made a lot of new contacts for the blog.  Not really.  I just kept eating the appetizers.

Wayfair 2016 Trade Tastemaker Awards

This was the cool bar area.  These bartenders were like out of the Tom Cruise movie, Cocktail.  They would throw the shakers and mix multiple drinks at once.  Kind of impressive.  Of course, they were still not as popular as the guy frying the bacon-wrapped-dates.  That guy won.

Wayfair 2016 Trade Tastemaker Awards

They (Wayfair) also had a photo booth set up and a bunch of props for the pictures.  I always do really well in the first picture but then I don’t know what to do for the other 3 shots.  Do I just keep smiling?  I can totally make a funny face as the second shot, but I only have one funny face that I know how to make so that still leaves another 2 pictures.  I inevitably come out with one of the shots talking as I ask the person next to me “what do we do now?”.  Does this happen to you?

Wayfair 2016 Trade Tastemaker Awards

You may recognize the picture below from my Instagram.  Here I am with my friend, Diriet Diaz, who is not only a great friend and a sharp dresser, but also happens to be a luxury real estate agent in the Miami area.  Not the best quality photo but it was a good hair day so it made the cut!  😉  It’s always a good hair day for Diriet.

Wayfair 2016 Trade Tastemaker Awards

Here are some of the Wayfair peeps, the winning designers and presenters.

Wayfair 2016 Trade Tastemaker Awards

Here I am with the super talented designer, Barclay Butera.  He was so sweet and was nice enough to take this picture with me.  Although his choices were limited because my friend already had the camera phone pointed and waiting.  Say cheese!  Seriously, all the designers were incredibly approachable and happy to be celebrating with all of us.

Wayfair 2016 Trade Tastemaker Awards

The evening came to a close after finally presenting the winners.  Before giving the awards we were all shown slides from the rooms that were submitted as entries.  They were all so original and with such fresh perspectives.

Wayfair 2016 Trade Tastemaker Awards

So we hung out a little longer (that’s me beside the lady in the blue blouse) and then called it a night.  My boys were all home waiting for me and greeted me at the door like I had been gone for 24 hours.

Wayfair 2016 Trade Tastemaker Awards

One of the bonuses about blogging has been being a part of these cool communities and being able to go to events that are both fun and inspiring.  The other bonus was not having to make dinner because the husband was holding down the fort.  So thank you Wayfair and thank you husband.  And thank you pizza delivery man.  And thank you bacon wrapped dates.

Feeling grateful –

Maria


Filed Under: Outdoor Living, Sponsored, Uncategorized · Tagged: Awards, Miami, Tastemaker, wayfair, Wayfair Trade Tastemaker Awards

The Spring Table

March 6, 2016 · by Maria · 24 Comments

The Spring Table

If you follow me on Instagram then you know it’s no secret that I love tablescapes and flowers.  Every time that I host a get together, I think of the table setting before even planning the menu.  I actually like to set my table 1 or 2 days in advance so that I can choose and move pieces around without being in a rush.

Even when I am not hosting an event, I try to set a pretty table for us to enjoy, although we rarely sit in the dining room for weekday meals – we usually sit in our kitchen table.  Many times I will have a versatile faux arrangement (usually just greenery) as the centerpiece and I change around my chargers and plates to create a different look.  I will leave that out for a month or so and then remove everything, throughly clean the table and start again.

My favorite table settings are when the flowers go on sale at the market and I can really get creative.  Whole Foods Market and Trader Joe’s tend to have reasonable prices for quality flowers.  Sometimes they will have a “Value bouquet” that you can purchase 2 of and create a really full and interesting arrangement.

Below is the arrangement and table setting that I set up for spring – fun, bright and romantic.


The Spring Table

What I love about the mixed value bouquets is that they usually include at least 3 types of flowers that you can mix with some roses and create something really special at home.  Something that looks like it came out of a magazine.


The Spring Table

The rest of the table was a nod to the flowers.  I chose the napkins and plates in Spring colors that would complement the flowers.  I love having an assortment of linens to choose from when it’s time for dressing the table.  These napkins were less than 2 dollars a piece (from Sur La Table) and they really play off the yellow flowers.

I added 2 egg wreaths to cage some candles since I may keep this setting throughout Easter.  If I change it again, I will be sure to share it with you!


The Spring Table

Because my table is so formal (more than I would like) I add earthy elements like the woven charger and the terra-cotta napkin ring, to make the table setting more dimensional.  Also, because the rest of my home is no longer as formal, I like to add casual touches to this formal space.

Although most of my dinnerware is white, I do have a few colorful accent pieces that I can use throughout the year.  Usually it’s accent plates which take up less room to later store.  These rope design blue plates were found at Homegoods.  The dinner plates underneath are white with a green border and a gold rim.  They are from Williams-Sonoma and I purchased them on clearance after their Easter sale last year.  I love those clearance buys because while these plates were considered “Easter” plates to them, they are simple enough to be used in almost any tablescape – Christmas, Mother’s Day and even Thanksgiving.

Don’t shy away from the “expensive” stores as they sometimes have steep sales that can help you build your entertaining inventory.  If you don’t have the space or desire to have a bunch of plates, simple white dinnerware is beautiful.  Just be sure to purchase a few extra plates to account for breakage over the years.  White dinnerware is classic, timeless and food looks great on a white backdrop.

The Spring Table

These green cups have been in my arsenal for over 15 years.  They were on a mega-clearance and I purchased like 15 of them, thinking that a few may break over the years.  All 15 are still standing – so to speak.

The Spring Table

Of course, these flowers will eventually wilt and I won’t create this sort of arrangement weekly (although I wish I could!) but then I will keep the rest of the table setting and replace the flowers with a faux arrangement or some other less-opulent flower combo.  Nonetheless, I enjoy having them while they last.  I love walking by the dining room everyday and having a pretty table to greet me and my family.

Ready for some more Spring love and ideas?  Hometalk is hosting a #DIYMySpring Blog Hop and you will love all the inspiration!  

Hometalk's DIY MY SPRING! 400


An InLinkz Link-up


Filed Under: Decorate, Easter, Spring, Summer, Uncategorized · Tagged: easter, Hometalk, spring, table, Table settings

Baskets for Mom

March 1, 2016 · by Maria · 2 Comments

This shop has been compensated by Collective Bias, Inc. and its advertiser. All opinions are mine alone. #SipIndulgence #CollectiveBias

Baskets for Mom

It’s almost Mother’s Day…well, not exactly – but it will be here in no time.  I have shared with you how we often host brunch for Mother’s Day and invite some of the moms of the family.  I prefer to host an event, early in the day and that way I don’t have to spend the day visiting everyone and I also get the rest of the day to myself.

Every year I do something a little different (except for the menu, which is almost always the same thing) as far as the gifts that I give the moms.  Some years I have set a pretty table and I line the table with orchids and each orchid is the gift for the moms.  It’s a great idea because the orchids adorn your party and also serve as gifts.  This year I wanted to do something a little different so I was going to make baskets for each mom to gift them after the brunch.  Then I thought it would be fun to let everyone make their own basket.

Baskets for Mom

Most baskets this time of the year resemble Easter baskets but I was able to find these simple little crates that would also work for Mother’s Day.  They were only $3.00 each which was great!

Baskets for Mom

I added a little bag of paper shreds to each crate.  That way each person could line their basket before filling it up.

Baskets for Mom

The idea was that everyone can pick one item from all the groupings to add to their basket.  One of the items the moms could choose from were coffee mugs.  I loved the “mom” one which was perfect for this event.  It will probably be the first to go!

Also, inside each mug is a pack of instant coffee.

Naturally, to go with the coffee and the pretty mugs, some indulgent coffee creamer.  I chose a few of the NESTLÉ® COFFEE-MATE® Liquid Coffee Creamers.  I purchased quite a few flavors but the most popular were the chocolate boutique flavors – Salted Caramel, the Chocolate Toffee Truffle and the Cafe Mocha.

Baskets for Mom

Of course, nothing says pampering for mom like a candle.  These were so pretty in the rose gold tone which perfectly matched the tablescape.

Baskets for Mom

I thought it was a fun idea to add a jar full of nail polishes so that everyone could pick their own.  It was the area that everyone stood the longest, picking out their shade.

Baskets for Mom

Stationary and pencils.  Hello Spring!

Baskets for Mom

Here are a few pictures of everyone making their baskets or the kids making the baskets for the mom.

Baskets for Mom

Baskets for Mom

Every time that I host something like this in my home, my favorite thing to see is all the generations coming together.

Baskets for Mom

Baskets for Mom

Baskets for Mom

Every basket looked a little different and that was the idea!

Baskets for Mom

This little one needed some assistance making the basket, but no help was needed in making his mom feel special.  Love that little one!

Baskets for Mom

Like I mentioned, my Mother’s Day brunch menu rarely changes.  I served some cookies, a frittata and a salad.  I made the frittata that the Barefoot Contessa makes which was inspired by the owner of Loaves & Fishes in the Hamptons.  I love all of her recipes but this one is my favorite.  I do make some adaptations like the cooking time and the original recipe calls for basil, which the adults tend to love and the boys…not so much, so I omitted that.

Potato Frittata

Ingredients
8 tablespoons (1 stick) unsalted butter, divided
2 cups peeled and 1/2-inch diced boiling potatoes (4 potatoes)
8 extra-large eggs
15 ounces ricotta cheese
3/4 pound Gruyere cheese, grated
1/2 teaspoon kosher salt
1/2 teaspoon freshly ground black pepper
1/3 cup flour
3/4 teaspoon baking powder

Directions

Heat the oven to 350 degrees F.

Melt 3 tablespoons of butter in a 10-inch (oven-proof) pan over medium-low heat. Add the potatoes and fry them until cooked through, turning often, about 20 minutes. Melt the remaining 5 tablespoons of butter in a small dish in the microwave.

Meanwhile, whisk the eggs, then stir in the ricotta, Gruyere, melted butter, salt, pepper.  Sprinkle on the flour and baking powder and stir into the egg mixture.

Pour the egg mixture over the potatoes and place the pan in the center of the oven. Bake the frittata for 1 hour, until it is browned and puffed.  It will be rounded and firm in the middle and a knife inserted in the frittata should come out clean.

Note: Sometimes I substitute swiss cheese for the gruyere.  Nothing quite substitutes the nuttiness of the gruyere, but it will do if you don’t have it available.

Baskets for Mom

Of course my mom said “don’t you dare post that picture of me eating.”  Haha.  There you go.  You still look good mom!

Baskets for Mom

Baskets for Mom

We clearly celebrated Mother’s Day early to be able to present you with this idea, but we enjoyed it so much that we are thinking of replicating it for the actual Mother’s Day brunch.

Baskets for Mom

The variety of creamers that were in my baskets were found in Walmart and you can find a $0.75 coupon HERE.  Actually, a lot of the little items that went into the baskets were also picked up at Walmart.

Baskets for Mom


Filed Under: Decorate, Family, Recipes, Sponsored, Spring · Tagged: Baskets, brunch, mothers day, party, quiche

Margarita Cupcakes

February 26, 2016 · by Maria · 3 Comments

Margarita Cupcake

How is the home organizing coming along?  Need a tiny break?

Margarita Cupcakes

Today we are doing something a little different.  I am taking a break from the wave of new year organizing and making a little mess in the kitchen – just a little.  A few weeks ago I was asked to bring something sweet to a little get together with friends and I immediately knew that I wanted to bring cupcakes, but I wanted them to be special.  Literally within days of that invitation, I was asked by Wayfair if I wanted to be a part of a fun campaign they were doing called #Cocktail2Cupcake .  I said yes and decided to merge my most favorite drink, the margarita with a plain cupcake recipe that I already had.

I love a good margarita and my husband makes the best ones.  I rarely order them in restaurants because I know that they usually make them using sour mix and a bunch of artificial stuff.  My husband has me spoiled with the real deal – a simple recipe that uses real ingredients.

I took a basic cupcake recipe that I had and I added some lime tequila and grand mariner, which are ingredients in the margaritas that he makes me.

Margarita Cupcakes

Here is the recipe that I used and it yielded 24 cupcakes.


INGREDIENTS

3 cups of cake flour

1 tablespoon of baking powder

2 1/4 cup of sugar

1 teaspoon of salt

1 cup of room temperature unsalted butter

4 eggs at room temperature

1/4 cup of freshly squeezed lime juice

2 tablespoons of tequila

1 teaspoon of vanilla extract

1 cup of buttermilk


INSTRUCTIONS 

1- Pre-heat your oven to 325 degrees F.  Prepare the muffin pans with the liners.

2- In a medium bowl, mix the flour, baking powder and salt.  Set aside.

3- Using an electric mixer with the paddle attachment, cream the sugar and the room temp butter for a few minutes.  Then add the eggs one at a time.  Incorporate the vanilla, lime juice and the tequila.  Be warned that at this point the mixture will appear to be too loose.

4- With the mixer on low, start incorporating your dry ingredients into the wet, alternating with the buttermilk.  Do not over mix.  You just want it to be incorporated.  (I mention this because once you add the flour, you can really mess up the outcome of any cupcake by over mixing.)

5- Divide the batter between the lined muffin/cupcake pans and only fill until they are 3/4 full.  Bake the cupcakes about 20 minutes, or until a toothpick comes out clean. (Do not over bake, I start checking mine after 19 minutes.)

6- Allow to cool on a wire rack.


The frosting – 

2 boxes of confectioners sugar

2 sticks unsalted butter

2 1/2 teaspoons of lime juice

2 tablespoons of Grand Marnier

1 teaspoon of tequila

pinch of salt

1- Blend the sugar and butter until smooth.  Add the lime juice, Grand Marnier, tequila, and salt.

2- Pipe the frosting using a star tip onto the cooled cupcakes.

Margarita Cupcakes

Enjoy!  I know that my friends loved them and not only were these delicious but they were beautiful.  I added a thin wedge of lime that I tossed in some sugar before placing on the cupcake.

Have an awesome weekend friends.  I’m ready for a real margarita!


Filed Under: Recipes, Sponsored, Uncategorized · Tagged: cupcakes, recipe

Easy Brunch to Host In The New Year

February 10, 2016 · by Maria · 6 Comments

This shop has been compensated by Collective Bias, Inc. and its advertiser. All opinions are mine alone. #SienteGlade #CollectiveBias

Easy Brunch to Host In The New Year

Traditions…they are woven into our holidays and are so much fun to create and continue with our families. Granted, December is a month full of traditions because of the holidays, but in our family, we squeeze one more little gathering in after the New Year. The Spanish start the new year with a bowl of lentils, (don’t ask me what it means because I have no idea) but I love lentils and I love family, so who am I to stop this awesome tradition? The New Year is a great time to reconnect with family and friends and here is an easy brunch to bring everyone together!

Sometime during the month of January (usually later than most), we put away all the Christmas decorations and it’s out with the red and in with my usual muted tones, which I miss after months of jewel tones and glitter everywhere. I actually end up finding glitter all over my home well into February! After I give the house a good cleaning, I will usually light a candle or in this case, use a candle melt.  Again, after all the peppermint scented items from Christmas, I long for clean scents. Here I am using one from Glade® called Clean Linen®.

Tradition - A New Year's Brunch

The trick with this brunch is to make it simple. After putting together so many holiday spreads in December, this needs to be really easy – hearty but minimal amount of food. We always accompany the lentils with a Tortilla Espanola (Spanish Omelette). Again, when you think of these two items, they are not exactly a perfect pairing, but it’s just what my Cuban family has done for years and I am just following along. While not the perfect pairing, they are both delicious!

Tradition - A New Year's Brunch

This omelette has lots of potatoes that are cooked in olive oil along with thinly sliced onions, before being incorporated into the egg – yielding a really thick and hearty omelette.

And delicious.

Tradition - A New Year's Brunch

I make the lentils in a large pressure cooker and I add onions, garlic, green pepper, squash, carrots, potatoes, Spanish chorizo and Spanish paprika. I also add the ham bone from the honey baked ham that I serve during Thanksgiving. Every year after Thanksgiving dinner, I freeze the ham bone (that still holds quite a bit of ham) to use for my lentils brunch.  This gives the soup a lot more flavor.  The pressure cooker makes everything very tender and when the soup is done, I simply shred the ham that is falling off the bone and I add it to the soup, discarding the bone.  We make lentil soup during the year, but none is as flavorful as this one.

Here is my mom serving my oldest a plate of lentils. Grandmas are always concerned about their grandkids getting enough to eat. I think that’s a universal sentiment.

Tradition - A New Year's Brunch

We all sit in the dining room and eat and talk and go back for seconds.

Tradition - A New Year's Brunch

Of course, the only thing missing is dessert. I added a little banner to this white cake to highlight what we are celebrating!

Tradition - A New Year's Brunch

Putting together a little party like this is easy, it just takes a little planning. Here are some of the things that I do to ensure a relaxed atmosphere for my guests and even for myself.

1 – Choose a few items that can be served cold or room temperature. While the lentils should be served hot or warm, the Spanish omelette can be served at room temperature. That is one less thing to fuss over. Other food options that do well at room temperature are, homemade granola with yogurt drizzle; also a quiche or a strata usually hold up well on a buffet table.

Tradition - A New Year's Brunch

2- Keep the decorations simple. Sometimes I just leave out the white and silver decorations from holidays and add some fresh flowers to the mix so it doesn’t look Christmas-ey. I love decorating, but the new year feels like a time to simplify.

3 – I purchase a store-bought cake. I think it’s a mistake to try to make everything yourself unless you feel like you have the time and desire to do so.  If you are already making the first course and the side, buy the dessert or have someone bring it.

Tip: If your cake is small like mine, just place it on a pretty stand and add some greenery around the base.

4 – Have your dishwasher empty and ready to load. For a small gathering, like this one, I use “real” plates but I always have the dishwasher empty so that I can quickly load them in there. Otherwise, I recommend paper plates.  Anything to keep it pretty and easy.  If you use paper plates, you will also have more garbage.  Make sure to have enough garbage bags under your trash bin so that you can quickly swap them out once full.


Tradition - A New Year's Brunch

5- Stock up on candles and scents for your party and so that you can kick back once everyone has left.  Candles and scents can transform your space.  I placed a Glade® Wax Melts on the warmer tray and within minutes it was dispersing a clean scent throughout my home. These melts provide up to 16 hours of fragrance.

Tradition - A New Year's Brunch

Here it is all melted.

Tradition - A New Year's Brunch

You know who else melted? Me! Into my pajamas once everyone left. It was fun, it was yummy and I need a nap!

If you need me I will be here, continuing to write the wrong year on my checks.

Have you hosted any get togethers so far this year? Have you attended any?


For more great ideas, you can follow the Siente Glade Social Hub.

You can find a @Glade coupon offer here.

You can follow @Glade on Twitter https://twitter.com/glade

You can also follow @Glade on Facebook here. 


Filed Under: Christmas, Decorate, Dining Room, Family, Sponsored, Uncategorized, Winter · Tagged: brunch, candle, New Years, Spanish Lentils

Closet Perfection with Xangar

January 29, 2016 · by Maria · Leave a Comment

A few days ago I shared my tips for organizing the master closet but I left out the latest and greatest addition to my closet – Xangar hanger spacers .  Every year I go through my wardrobe and I try to get rid of items that I no longer use, at least I thought that’s what I was doing.  You see, I was really only making enough space for my items to fit and not be stuffed in the closet, but once I achieved that, I wouldn’t make a final push to get rid of unnecessary items.  Although I thought I was ruthless in my approach to streamlining my wardrobe, I was really ignoring a lot of clothes that needed to go but they stayed.  They stayed because I loved the item, they used to fit me well, I wished they fit me well, items I paid a lot for but no longer used… they stayed in the closet because they fit in the closet and it’s not like I needed to make space for anything else.

Closet Perfection with Xangar

I was introduced to Xangar hanger spacers last year and I thought I would give them a try.  I have to admit that I first thought, “won’t they take up additional space in my closet?” and the answer is yes – they took up space but what they gave me in return was greater.  Since I knew I was adding the spacers, I went item-by-item and got rid of so much clothing!  So much!  They were items that I had not worn in years and were just in my closet because there was space for them and no other reason.  I donated all those items and I instantly felt so much better about not housing so many unused pieces of clothing.

Closet Perfection with Xangar

Perfectly Organized

When I added the Xangar hanger spacers, a pet peeve of mine was fixed and that’s how hangers are never perfectly separated and would sometimes overlap.  This would sometimes make me pull out more than one item at a time.  I realize that this is not a “real” problem and there are more important things in life (like dark cho