Graceful Order

Organizing and Decorating the home.

  • Home
  • Organize
    • Kitchen
    • Laundry
    • Living Room
    • Bedrooms
    • Bathrooms
    • Closets
    • Office
    • Garage
    • Other
  • Decorate
    • Fall
    • Winter
    • Dining Room
    • Bedroom
    • Bathroom
    • Office
  • Clean
    • Kitchen
    • Bathrooms
  • Entertain
    • Christmas
    • Thanksgiving
    • Recipes
    • Reflect

Roasted Butternut Squash Soup

December 10, 2015 · by Maria · Leave a Comment

This shop has been compensated by Collective Bias, Inc. and its advertiser. All opinions are mine alone. #SamsClubMag #CollectiveBias

Roasted Butternut Squash Soup

This month’s issue of Sam’s Club Healthy Living Magazine talks about being mindful when we eat and encourages us to look for ways that we can cut back on calories, while not sacrificing flavor.  I wanted to contribute one of my favorite recipes to this challenge – Roasted Butternut Squash Soup.  The original recipe calls for heavy cream and butter and well…it’s delicious but not low fat.  I made some simple modifications and I was surprised to see (or taste) that my favorite soup was still amazing, even with a few swap-outs.

Roasted Butternut Squash Soup

Roasted Squash Soup

2 tablespoons coconut oil

1 large onion, diced

2 pounds of butternut squash

1 apple, cut into chunks

1 (15 ounce) can of pumpkin puree

4 cups of low sodium vegetable or chicken stock

2 teaspoons of salt

1/4 teaspoon of pepper

1 cup of low fat milk


The first step in this recipe is to roast your butternut squash.  

Note : A good shortcut that will allow you to skip this step altogether is to purchase pre-cut butternut squash – it will not be as flavorful but still delicious and a time-saver.   

Set your oven to 400 degrees.  Carefully cut the squash in half and brush some olive oil on the cut side facing up.  Cook the squash in the oven for 20 minutes.

Roasted Butternut Squash Soup


In the meantime, add the coconut oil to a pot and sauté your onions.  I allow them to cook slowly so that they become somewhat caramelized.

Note: There is no need to cut the onions perfectly, as everything will be pureed at the end.  Allowing your onions to cook slowly and caramelize will add sweetness to your soup; we are not adding sugar like most squash soup recipes.

Roasted Butternut Squash Soup

Remove the butternut squash from the oven and allow to cool.  Slice the skin off and cut into chunks.

Roasted Butternut Squash Soup

Your squash may be cooked all the way through or you may notice that in some areas it is not.  That’s ok because it will continue to cook inside the pot.

Roasted Butternut Squash Soup


Add the pumpkin puree, the diced apple, diced butternut squash, stock, salt, and pepper to the pot with the onions.

Notes:  The pumpkin puree will give this soup a lot of flavor and body.  Make sure that you are not using pumpkin pie filling which is completely different.

Also,  the apple is optional.  If you like a sweeter soup, add it.  Otherwise, you can skip that ingredient.


Roasted Butternut Squash Soup

Cover the pot and simmer over medium heat for about 15-20 minutes.

Roasted Butternut Squash Soup

I turn off the heat and allow the soup to cool slightly.  Next, I get out one of my favorite kitchen tools – the immersion blender.  If you don’t have one, you can use a traditional blender.  I love how I can puree soups right inside the pot.   Once pureed, add the milk and heat the soup through once more.  Make sure the salt level is ok and if not, you can add.  This varies depending on how salty the stock was that we initially added.

Your delicious soup is done.  Serve and enjoy!

Roasted Butternut Squash Soup

One more thing, for a touch of decadence (and since we already cut so many calories) you can add a small dollop of creme fraiche to the soup.  #OverTheTop

Roasted Butternut Squash Soup

Ingredients for this post were found at Sam’s Club (mostly the baking aisle).  For more tips on healthy eating, check out Sam’s Club Healthy Living Magazine!

Sam's Club

I’d love to hear about your favorite soup recipe!


Filed Under: Fall, Recipes, Uncategorized · Tagged: butternut squash, pumpkin, recipe, Soup

Food and Storage Needs With Rubbermaid®

December 10, 2015 · by Maria · 1 Comment

I am so excited to finally be able to share with you this new product that I have been using and loving, called Rubbermaid® fasten + go.  It is new and will be available at Target starting 12/27.  So far I only have one but I am marking my calendar so that I can buy a few more when they are finally available.  So what is it exactly?  Well there are 3 kits available – an entree kit, a soup kit and a sandwich kit. 

I have seen lunch kits before in the stores, but this one is different!  The Rubbermaid® fasten + go kits features:  

  • A removable carry strap that allows for easy transportation 
  • Smaller containers can be removed for customizable meals
  • Containers can be nested for compact storing
  • Lids snap to the base to allow for secure transportation
  • BPA-free, Microwave and Dishwasher Safe

Food and Storage Needs With Rubbermaid®

So far I have only tried the sandwich kit, which consists of the following:

    • Base perfect for square or rectangular bread
    • 1 side container – 1 cup capacity
    • 2 snack containers – ½  cup capacity each
    • Outer lid
    • Removable strap


Food and Storage Needs With Rubbermaid®

This is how the kit is packaged at the store, and it is really easy to open and close.

Food and Storage Needs With Rubbermaid®

Sandwiches

First, I wanted to try it out for it’s intended purpose – sandwiches.  My husband often comes home to have lunch or he takes lunch with him.  Here is a simple and delicious sandwich with turkey, havarti cheese and avocado.

Note:  Avocado tends to oxidize pretty quickly, so I brush a little olive oil on the slices of avocado and that seems to keep the color.  I still haven’t found a method that will completely stop them from loosing their green color, but the olive oil seems to work even better than the lemon juice.

Food and Storage Needs With Rubbermaid®

It ended up being a pretty thick sandwich.

Food and Storage Needs With Rubbermaid®

But it still fit nicely inside the container.

Food and Storage Needs With Rubbermaid®

Healthy Eating

If you are looking to start (or continue) eating healthy, the little containers are a great way to portion your sides or snacks.  Below, I placed a hard-boiled egg inside one small container, almonds in another and celery and hummus in the medium container.

Food and Storage Needs With Rubbermaid®

For my boys I would serve a similar lunch, minus the avocado.  I added a small portion of miniature cookies and some veggies with ranch dip.

Food and Storage Needs With Rubbermaid®

Sewing Kit

Of course the organizer in me took over and I started finding other uses for the fasten + go kit.  Here I set up a little sewing kit.  This is great for those of us that can’t sew very well, but need to hem some pants or add a button here and there.

Food and Storage Needs With Rubbermaid®

Jewelry Kit

A jewelry kit!  I recently went on a cruise and all my necklaces were tangled with the earrings by the time that I unpacked.  When I place them inside the kit, they each have a separate compartment and I love that!

Food and Storage Needs With Rubbermaid®

For now, I will use mine for lunches but as soon as they are released in January I will buy a few extras for organizing items around the house.  The kits are available in 3 colors – smoke grey, seafoam green (mine) and marsala red.  I think I will buy the grey ones for storage and another seafoam green for our lunches.

Food and Storage Needs With Rubbermaid®

Do you make lunches for yourself or your family?  Do you have a tip for keeping avocados green?  Help a girl out.


“This post is part of a social shopper marketing insight campaign with Pollinate Media Group®, Rubbermaid® fasten + go, but all my opinions are my own. #pmedia #FastenNGo http://my-disclosur.es/OBsstV”


Filed Under: Kitchen, Recipes, Uncategorized · Tagged: food storage container, lunch, meal prep, Organization, recipe, rubbermaid, sandwiches, storage

My Home Style Blog Hop: The Christmas Tree

December 9, 2015 · by Maria · 11 Comments

My Home Style Blog Hop: The Christmas Tree

Earlier this week I shared my Christmas Home Tour and promised details about my tree later in the week, so here it is.

I am actually joining a group of 25 bloggers who will be sharing their Christmas tree style with you – all week-long.  If you are following the blog hop from Blue I Style, welcome!  The “My Home Style – Christmas Edition” blog hop is hosted by Stephanie of Casa Watkins so stop by to see her beautiful tree as well!  We will all be describing the style that we choose for our tree and telling you how and where you can achieve a similar look.  Of course, if your tree is already up, you can just enjoy sitting back and checking out everyone’s tree.  That’s what I will be doing!

My Home Style Blog Hop: The Christmas Tree

My style is classic, traditional and timeless.  So timeless that my tree has looked almost the same for years and I am still not tired of it.  Truth is that I have always wanted a fake Christmas tree because they are so much easier to decorate.  However, my husband won’t even hear it because he loves having a fresh tree in the house.  He likes the whole process of picking out the tree with the boys, the scent in the home…all of it.  Granted, I love all that as well,  it’s just the decorating that is more difficult.  You see, with a real tree you have to find the right branch for that perfect ornament, but I have learned to work around that.

Here we are picking out our tree this year.

My Home Style Blog Hop: The Christmas Tree

After we buy our tree and bring it home, my husband adds the lights and we allow our tree to rest overnight.  Since the branches have been constricted for some time, they need to open up naturally without the weight of ornaments.  Of course the kids don’t like to wait so they put on their santa hats and we start to sort the decorations for the following day.

My Home Style Blog Hop: The Christmas Tree

I have quite a few boxes of decorations in my garage and they are all labeled by color.  We have flocked our tree in the past and when we do, I like to use silver and blue accents, but my favorite is the vibrant red and green decor.  Every year I will add an ornament or two to our tree.  This year, I added the gold monogram ornament below.  Monogrammed items are my weakness.  That and salted caramel chocolates.

My Home Style Blog Hop: The Christmas Tree

Use medium and oversized ornaments.

I like to mix up different sized ornaments so the decor looks more dimensional.  I add big ornaments but they need to be plastic, because otherwise the natural tree would not hold them.  As far as color, all the ornaments are gold, red or green.  I found these ornaments on Amazon.com with all three colors.  They are a medium-sized which are great to fill in the tree.  The really large ones are from Bj’s Wholesale Club.  The poinsettia are from everywhere.  Some are picks meant for trees and others are pulled from faux poinsettia plants.

My Home Style Blog Hop: The Christmas Tree

My Home Style Blog Hop: The Christmas Tree

Beautifully wrapped gifts add a designer look to the tree. 

I wait until Christmas to add the boys’ gifts but I start wrapping all the adult gifts early on so that they can go under the tree right away.  Wrapping paper and cloth ribbon is inexpensive and makes a huge difference to your tree.  So much so that if you don’t have gifts to place under your tree, you can consider wrapping empty boxes just to add color and fullness to the bottom of the tree.

My Home Style Blog Hop: The Christmas Tree

Mix trendy with traditional ornaments.  

Right now reindeer/antler items are the rage and I purchased a few of those decorations last year in an after-Christmas sale.  I also love “words” on the tree and Target seems to have a few new ones to choose from every year.

My Home Style Blog Hop: The Christmas Tree

Add metallic colors to pick up on the lights on the tree.

Admittedly, after decorating the tree, there is glitter everywhere but all those gold accents look beautiful once the tree lights are on.  I add gold garland all around the tree and a bunch gold twig picks throughout the empty spaces.

My Home Style Blog Hop: The Christmas Tree

That’s my tree.  Maybe next year my husband will be on board with buying a fake tree.  Actually, that will never happen.  In the meantime I will enjoy my real tree and enjoy the fact that it is a little different shape every year.  Who decorates the tree in your home?  You, the kids or everyone together?

Next up is Amy from My Life From Home and below are all the links to the hop.


This post may contain affiliate links.  Buying through these affiliate links does not affect the price of the item.  Thank you for your support!


Eager for more Christmas Tree styles?
Check out the other Christmas Tree stylings by these amazing bloggers.
Monday:
Casa Watkins
Up To Date Interiors
Pretty Practical Home
Domicile 37
Elizabeth Joan Design
Tuesday:
Roots North and South
Shabby Grace Blog
Pocketful of Posies
A Designer At Home
The Happy Housie
Wednesday:
Around the Watts House
Flourish & Knot
Blue i Style
Graceful Order
My Life From Home
Thursday:
This Is Our Bliss
This Makes That
Southern State of Mind
Vintage Romance Style
Designing Vibes
Friday:
Little Red Brick House
Lovely Etc.
Farmhouse 40
A House Full of Sunshine
Organize Nashville


Filed Under: Christmas, Uncategorized, Winter · Tagged: Christmas, christmas decor, christmas tree

Entryway Organization – Organizing with Boxes

December 7, 2015 · by Maria · 9 Comments

Entryway Organization - Organizing with Boxes

Lately it’s been all about holiday entertaining and organization has taken a back seat over here at Graceful Order.  Yesterday, I posted my Christmas Home Tour and some of you noticed that my storage bins (below) were gone.  You see, while I usually wait until January to get my organizing systems back in shape, my entryway organization could not wait.

You may recall that these (see below) were the bins that I used to have and love.  That buffet in the entrance of my home doubles as a catchall and even mudroom of sorts.  One of the main reasons that I liked the old bins was that they were open, but lately it was the reason I no longer liked them.  As the boy’s bike gear got larger, I didn’t like seeing Ninja Turtles peeking out from my formal buffet.  In the family room, I am a lot more relaxed with our style, but I like a couple of rooms to be off limits for green ninjas.  Is that too much to ask?

Entryway Organization - Organizing with Boxes

Although I knew that I wanted to change the bins, it took me a while to find the right ones.  This time I wanted boxes with lids.  I still wanted to keep the functionality of the space by being able to put away the boys’ gear and all my other dining room necessities, but I didn’t want for the space to look cluttered.  Also, this room has a neutral color scheme and I didn’t want a bunch of colorful items sticking out from the bottom of the buffet.

So the boxes had to have a lid, they had to be large and they had to be durable as the boys will be pulling them out all the time.

Entryway Organization - Organizing with Boxes

When Samsill reached out to me to introduce their Pop N Store boxes, I went on their site, saw the little video and knew that they would be perfect for my space.  The boxes are collapsible, stackable and available in 5 colors.  My favorite color is the white, but in this case, I was looking for the boxes to conceal and to blend into the furniture – brown was perfect for me.

Entryway Organization - Organizing with Boxes

So I took the measurements and ordered 4 of their Mega Boxes.  As soon as they arrived I was impressed with their quality and how easy they were to assemble.

Entryway Organization - Organizing with Boxes

Check out the contents of all the boxes:  Roller skates, safety gear, seldom-used pie dishes and linen napkins.

Entryway Organization - Organizing with Boxes

This was my personal favorite – I was able to place my linen napkins on their side inside the box.  This makes it to easy to grab a stack of the napkins I need for a dinner party.

Entryway Organization - Organizing with Boxes

The boxes fit under the buffet perfectly.  They have a lined bottom so my furniture won’t get scratched when the kids quickly pull out the boxes to get what they need.  I love those details!

Entryway Organization - Organizing with Boxes

As a bonus, I was able to clear out the inside of the hutch that used to hold the pie plates, and place all my chargers together in one spot.

Entryway Organization - Organizing with Boxes

Organization plus style is a win in my book!

Entryway Organization - Organizing with Boxes

Do you have a mudroom in your home or do you have to improvise like me?  Do you already use covered boxes to organize what you want to keep out of sight?


This post was sponsored by Samsill.  I only recommend products that I own and love and all the opinions above are based on my own experience.  

Filed Under: Living Room, Other, Uncategorized · Tagged: Organization, organize with boxes

My Home for Christmas

December 6, 2015 · by Maria · 19 Comments

Hello friends!  I can tell you that I am officially done decorating my home for the Christmas season, and while I will be picking glitter out of my hair for the next week, I love all the decorations!  During the week I will give you many more details on all the rooms that I decorated (living room, dining room and family room) but for now I wanted to give you a quick tour of my home this Christmas.

I am joining  Hometalk.com and CountryLiving.com in a “Home for Christmas” event featuring lots of creative and talented bloggers.  I am sharing my home tour, but bloggers will be sharing different Christmas projects, so be sure to check out the links below and the hashtag #HomeForChristmas in all your social media.

Christmas Tour Cover

Some people choose a color scheme for the whole house and they bring it into every room.  While I love the idea and the cohesiveness of decorating within one color family, I tend to slowly inject holiday colors into the home.

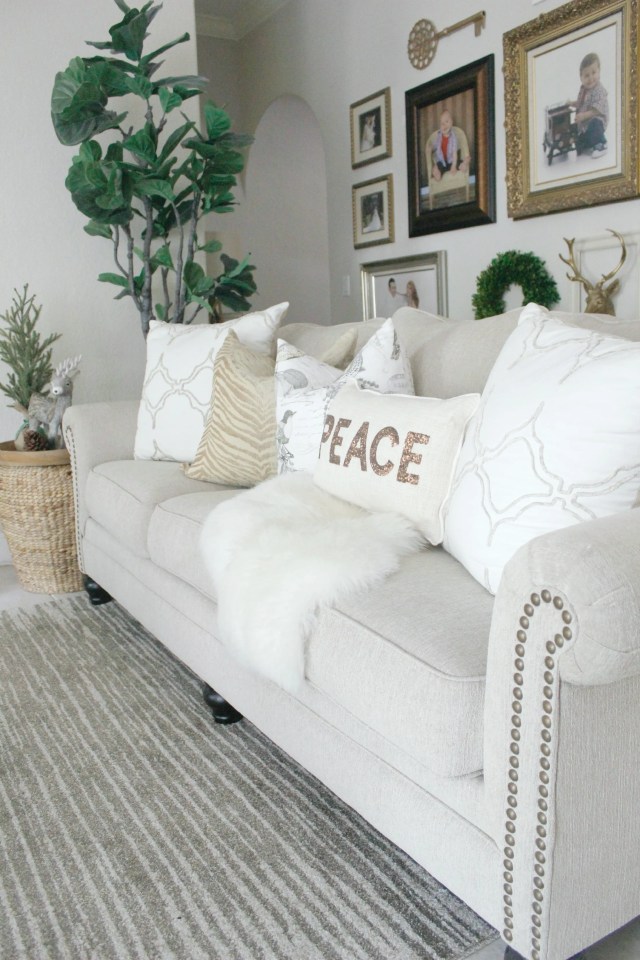
The first room that I will share with you is my living room.  All the colors in this room are neutral so I only bring in white, gold and silver to decorate.

My Home for Christmas

Last year I shared my Christmas home tour and you may recall a similar setup.  I simply changed around some of the pillows, including this little one that says PEACE that I found on my last Target trip.  I went in for a candle and walked away with a cart full.  Story of my life.

My Home for Christmas

Since the gallery wall in the background is busy, I like to keep all the other surrounding tables decorated simply.  Here I placed a large initial hurricane (a $5.00 score at Marshalls) on top of a mercury class pedestal.

My Home for Christmas

I love these mercury glass ornaments but they are so heavy that I simply cannot place them on my tree.  Instead, I placed them on the same leaf that I used to decorate for fall, and I added greenery for a small pop of color.  To add a little dimension and interest, I placed the leaf on a rustic tree trunk slice.

My Home for Christmas

The opposite side remains almost untouched – those colors match my decor year-round.

My Home for Christmas

You may recall how I decorated my buffet for fall – I considered removing the wreath and adding the same one that I used last year.  After adding the “Merry and Bright” marquis sign and the little tree, I decided that this wreath would also work perfectly for Christmas.  I didn’t even have to pull out the ladder which is great!

My Home for Christmas

On the opposite side, there is a pop of color with the stockings for the whole family.  My kids really get into stocking stuffers so I purchased some big ones last year.

My Home for Christmas

Making another appearance this year is this sweet little tree from last years Christmas home tour, I just changed it’s spot.  It’s tempting to decorate exactly the same way year-after-year, but it’s way more fun to find a new home for decorations.  Sometimes as I am unloading the holiday boxes from the garage, I place something down on a surface meaning to go back to it later.  All of a sudden I look at it and think “I kinda like it there”.  A different perspective on an old decoration.

My Home for Christmas

Since the living room and dining rooms connect, I like to graduate color into the adjacent room.  I purchased 20 feet of fresh garland this year when we bought our tree and they said it should last 30 days – let’s see if it does.  For now, I love how it frames the entrance to the dining room.  I used Command Brand hooks to keep it from damaging the wall.

My Home for Christmas

In a few days I will fill you in on more details of the dining room, but it’s basically a lot of layering greens, gold and white.

My Home for Christmas

A little fur on the head chairs and small pillow soften the dark wood colors of the dining room furniture.

My Home for Christmas

So far we have been holding back on color but no more!  The family room is the fun room and our favorite room to hang out.  This isn’t even the “best” spot to put up our tree but we place it here so that we can enjoy it while watching T.V. and hanging out.  In a few days I will also give you all the details from my tree decorating adventures.

P.S. It involves broken ornaments…sigh.

My Home for Christmas

All my pillows are from different stores but they all work together nicely.  The throw and the reindeer pillow are from Target (last year) and the large fur one is from ZGallerie.  I love adding touches of black to anchor all the other colors.

My Home for Christmas

I had to take more than one picture because it’s a rare sight for all my pillows to be on the couch and not part of some “Fort” on the floor.

My Home for Christmas

More pillows – The one in the back is from ZGallerie and the front one (which I love) is from Marshalls.

My Home for Christmas

Almost done with the pillows.  Snowflake pillow is from Target and the beautiful (and personalized) one in the front is from Tiny Prints.   It really is the most wonderful time of the year!

My Home for Christmas

Don’t cut corners!  I love using baskets in corners full of pillows or throws.  Can you believe that the little deer pillow is from the Target dollar section?  Adorable right?

My Home for Christmas

So that’s my home for the holidays, but the fun doesn’t stop here. #HomeForChristmas is full of ideas and I encourage you to check them out by clicking  on the links below.  

Have you done all your Holiday decorating?  Do you do it all in one day or do you space out your decorating?

Home for Christmas

An InLinkz Link-up

Filed Under: Christmas, Decorate, Dining Room, Living Room, Uncategorized, Winter · Tagged: Christmas, Christmas and holiday season, christmas decor, Christmas home tour

  • « Previous Page
  • 1
  • …
  • 5
  • 6
  • 7
  • 8
  • 9
  • …
  • 44
  • Next Page »

Welcome! I'm Maria, the blogger behind Graceful Order. I hope to share with you helpful ideas about organizing, cleaning and entertaining. I am passionate about living a healthy, balanced life with my husband and two boys. A life where I am in charge of my home and not the other way around. A life with a little bit of order, and a whole lot of grace!

  • Email
  • Facebook
  • Instagram
  • Pinterest
  • Twitter

Tips for Organizing Laundry Closets

Popular Posts from 2014

Posts of 2014

Blog Archives

Search by Month

Copyright © 2025 | Disclaimer

Copyright © 2025 · Innovative Child Theme on Genesis Framework · WordPress · Log in