Graceful Order

Organizing and Decorating the home.

  • Home
  • Organize
    • Kitchen
    • Laundry
    • Living Room
    • Bedrooms
    • Bathrooms
    • Closets
    • Office
    • Garage
    • Other
  • Decorate
    • Fall
    • Winter
    • Dining Room
    • Bedroom
    • Bathroom
    • Office
  • Clean
    • Kitchen
    • Bathrooms
  • Entertain
    • Christmas
    • Thanksgiving
    • Recipes
    • Reflect

Office Makeover – Before and After

June 8, 2014 · by Maria · 14 Comments

You all know that I love a good “before and after” and I know that you do too!   (Before I start sharing the pictures with you, I want to apologize in advance for the before pictures.  The angles are horrible.  I took them with my smartphone’s camera, before I even decided to share them on the blog.  Also, you will notice some strategically placed squares that hide private info.)

Office Organization

A couple of weeks ago, my friend asked me to help her fix up her office space at work.  Her husband owns an automobile business and she was helping her husband with the office work…except, the office didn’t work.  The men thought that the office was perfect.  They thought that it didn’t need a thing changed.  Why mess with perfection? The thing is that perfection looked like this…

Office remodel

and this…

Office Organization

These men were so dedicated to the sales, maintenance and growth of the business, that the back office space was just not top priority.  The store front was beautiful and we needed to make the back office match. With the help of IKEA, a screwdriver, and lots of good conversation, my friend and I embarked on a mission.  To prove the men wrong To make the office beautiful.  To create a space that was welcoming and practical. We started by painting the walls with a color called “Cloudy Day” by Sherwin Williams.  We painted the moldings white.  We also purchased white IKEA furniture that would be easy to clean and to customize. Here is the “after” picture of the wall pictured above. Office organization

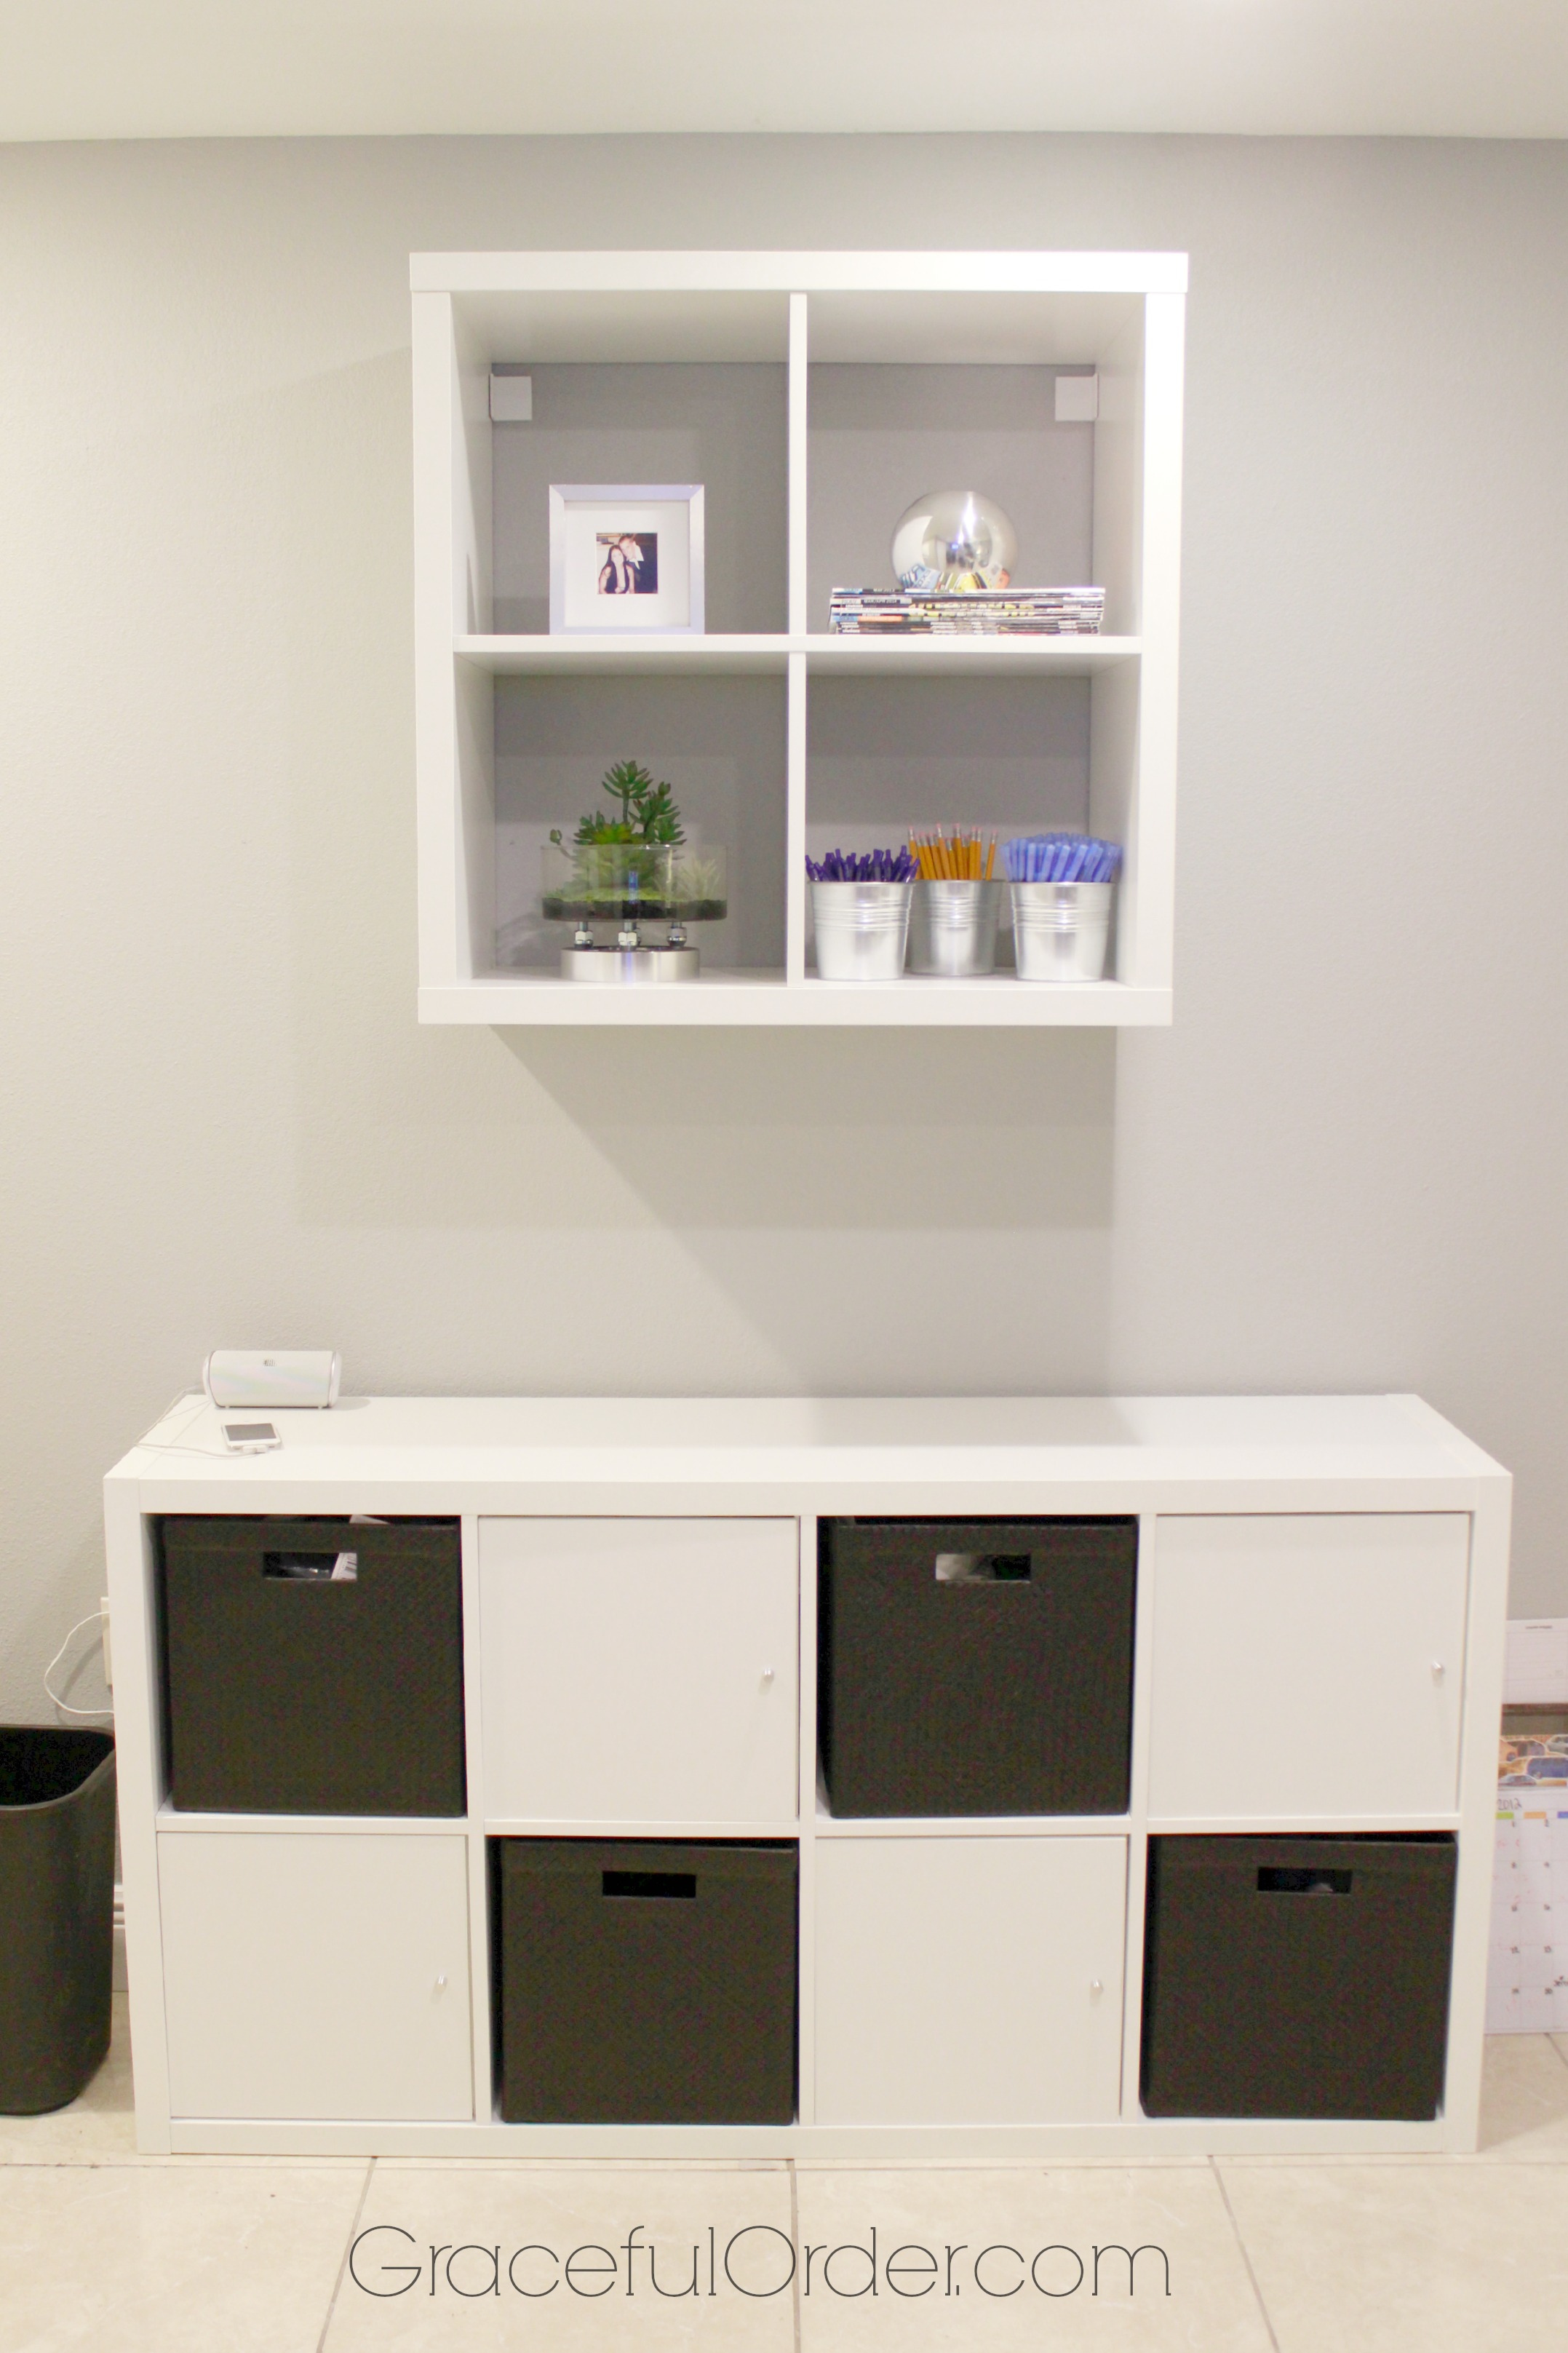
We chose open cubicles in the bookshelf for binders and we installed drawers in other cubicles for office supplies.  The idea was to leave out the practical and pretty and put away the practical and unsightly. We purchased new filing cabinets, a desk, and the lamp from IKEA.  I found the clock at Target. Office Organization

Of course, we had to add a little “pretty”, while keeping in mind that the office had to remain somewhat masculine.  There went all my washi tape dreams… We decorated with modern, inexpensive IKEA plants, like this one. Office Organization

And this one that I found at Target.  It was kind of short for the cubicle, so I lifted it with a car part.  I am not even sure what it is, but I loved the end result. Office Organization

I love decorating with practical items, such as these little IKEA buckets that hold all the pens and pencils. Office Organization

So one more time…We went from this,

Office remodel

To this,

Office Organization

The men at the office LOVED it and even asked for their own coffee station on top of the new cabinet.  No one misses the dark furniture and my friend is a happy camper. With a little bit of paint, some new furniture pieces and a lot of focus, any space can be transformed.  It’s important to feel comfortable where you work.  Maybe you can’t transform your whole office, but you can transform an area.  Anything to help you laugh while you work.  Actually, don’t laugh, just smile, abrupt laughter could scare co-workers. I hope you enjoyed the pictures and please share with me what is your favorite thing about your workspace.  Is it wall color, your desk, accessories, or your comfy chair?

Until next time,

Maria

Filed Under: Decorate, Office, Office, Top Navigation · Tagged: Decorating, ikea, office, Organization

Adding Wheels to Baskets

June 2, 2014 · by Maria · 3 Comments

I keep a basket in the hallway that leads to the boy’s bedrooms.  I use it to place small toys and items that I find around the house after the boys have gone to bed.  I don’t want to wake them up (especially my toddler…yikes) so I place the misplaced toys in this basket at night and in the morning, I place them back in their designated home.

End of story.  Perfect system, right?

Good system, yes.  Perfect, not so much.

I love woven baskets because they add warmth and texture to any space.  What I don’t like is how they are not easy to clean and they are a magnet for dust bunnies.

Adding Wheels to a Basket

I decided that the best solution was to add wheels to the basket, so that sweeping and vacuuming was easier and more effective.  I found some adhesive wheels on Amazon because screwing in wheels was not an option.

You can find these HERE in my Amazon store, but I am sure that any hardware store near you will also have them or similar ones.

Adding Wheels to a Basket


I followed the instructions on the package and adhered the wheels to my basket.  I also added a bit of glue to secure them further, considering the weave of the basket.  These wheels are intended for flat surfaces so I compensated with the addition of glue.

Adding Wheels to a Basket


Here it is with all four wheels.

Adding Wheels to a Basket

And here it is back in its place waiting for Elmo, Barney, or my favorite…tiny legos.

It’s hard to tell the difference (and that was the idea) but it is so much easier now to clean under the basket, and the wheels keep the basket cleaner.

Adding Wheels to a Basket


When I start spray painting, nothing in my home is safe.  I think it will be the same with wheels, no basket will be safe.

It’s worth mentioning that these wheels don’t swivel and I don’t know how much weight they can bear, but they are perfect for a simple project like this.  I think they may also work with under-bed storage since dust bunnies are another reason that I don’t keep anything under my bed.  I also have wheels on the baskets that I keep on my closets floors.  It is a simple solution that makes cleaning easier, and I am a fan of easy.

Can you think of anything that you can add these wheels to in your home?  Do you have the same problem with baskets and dust bunnies?  If so, I hope this will help!

Until next time,

Maria


Filed Under: Decorate, Other, Top Navigation, Uncategorized · Tagged: Adhesive Wheels, Baskets, Organization, Rolling baskets, Toy Box

Creating a Smoothie Station

May 26, 2014 · by Maria · 8 Comments

Smoothies have become so popular in the last couple of years.  It makes sense because we are all becoming more conscious of the ingredients that we consume and we want to avoid sugar-laden carbonated drinks.  We are also very busy and smoothies are portable, quick to make, and pack a lot of nutrition.

I think the healthiest smoothie that you can drink, is the one that you make yourself.  Why?  How many of you (like me) have gone into a smoothie chain, assuming you were getting a healthy drink, only to realize that they were using strawberries dunked in sugar syrup, or adding sugar and ice so that they could use less fruit.  Nope, I won’t pay 5.00 for that!  I prefer to spend the money buying quality ingredients and making my smoothies at home.

SMOOTHIE Organization

After buying all these awesome ingredients, I needed an equally awesome way to store them.

The cabinet where I kept all my smoothie supplies, was usually my “messy” cabinet.  It was not an absolute disaster, but it wasn’t practical either.  All the little packages of cocoa, flax-seed, chia seed, needed a new home.

Here is what the space used to look like.

Smoothie Organization

Packages everywhere.  Some of them were not even resealable.  I needed containers.

Smoothie Organization

I found these OXO containers at Target and I purchased them in two different sizes to accommodate the different products.  If you want to purchase them online, you can find them HERE, in my amazon store.

You may remember that they are the same containers that I used to create my Coffee Station.  You can read about that HERE.

Smoothie Organization

I also decided that I wanted to move the shelves around, to better fit the new containers.  I removed the cabinet door so that the shelves would slide out.

I also went ahead and gave the cabinet a good cleaning.

Smoothie Organization

I placed the shelves back after measuring the height that I needed.

Smoothie Station

I then emptied all the packages into the new containers and added labels.

Everything went back in the cabinet.

SMOOTHIE organization

Notice how narrow I made the shelf holding the mugs.   The coffee cabinet is right next to this one and I keep my mugs in here.  I like everything to match, except coffee mugs.  I like collecting different ones.

SMOOTHIE Station

In the very top, I placed the larger cans and containers.  Since I lowered that shelf, I can now reach up and grab whatever I need.  Before I did this, I could never reach the top shelf.

Smoothie Organization

I finished the project by hanging a clipboard to the cabinet.  I found this clipboard in the dollar section at Target.  I plan to keep smoothie recipes here.

SMOOTHIE Organization

Here is the finished product!

Smoothie Organization

It really is a pleasure to open up this cabinet now, considering how it looked before.

Please share with me if you make smoothies at home and what are your favorite types.  This week, I will share on Facebook a couple of my favorite smoothie recipes so stay tuned!

Shaking it up! (my corniness has no limits)

Maria

Filed Under: Kitchen, Other, Top Navigation, Uncategorized · Tagged: Kitchen Organization, Organization, Smoothie, Smoothie Station

Organizing The “No Junk” Drawer

May 19, 2014 · by Maria · Leave a Comment

This week, let’s take 10 minutes to tackle the junk drawer.  Instead of just tidying up what is already in there, lets resolve to make it a NO JUNK drawer or at the very least, less junk.

Lets face it, a drawer with the prestigious name, “The Junk Drawer” is the most likely to receive the least amount of love.  This is also the reason that its one of the most cringe-worthy areas in the kitchen.

I have always tried to keep the items in this drawer to a minimum, but lately I have simplified it further.

Here is what my “no junk” drawer looks like now.

Junk Drawer Organization


I have already shared with you that I don’t have the most spacious kitchen, and I didn’t want to dedicate a whole drawer for miscellaneous items.  The way I look at it is, if I dedicate a whole drawer for this, I will find a way to fill it up.  I gave myself half a drawer to work with and it made me rethink what I would keep in this space.

Half of the drawer is taken up by a steak knife block.  It fits perfectly in the drawer, it doesn’t shift and keeps the baskets next to it, in place.

Every junk drawer will look different and I encourage you to only keep items that you frequently use.  In my case, I keep scissors, writing tools, tape, memo pads and chip clips.  (By the way, I used to have like 10 chip clips in there and we rarely buy chips.  I also have a ton of workout gear and…well…back to the drawer).

Junk Drawer Organization

I also keep a little plastic container to collect Box Tops for my son’s school.  Otherwise, I know I would just throw them in the drawer and they would get lost since they are so small.

Junk Drawer Organization

So what are the steps to creating a “no junk” drawer that works for you?

1. Empty the contents of the drawer onto a nearby surface.

2.  Categorize items into Keep / Discard / Relocate  (later, you can relocate items that don’t belong in this drawer).

3.  Clean the drawer.  If you will use clear containers, you may decide to place a pretty liner on the drawer after cleaning.

4.  Containerize this space according to the items you are keeping.  I chose not to use a drawer divider made for junk drawers because it would take up the whole drawer and I would feel compelled to fill the spaces, even if I didn’t need them.  Instead, I chose clear containers with a colorful non-skid backing that I found at Target.  They had different sizes and you can customize your space.

Taking 10-15 minutes to do this small task will not only make your drawer pretty, it will also make it easier to find and put away items.  This will keep your drawer organized for a long time (or until your husband loses his keys and turns every drawer upside-down.  This may or may not depict an actual event that may or may not have occurred in my life.)

What else do you keep in the junk drawer?

Until next time!

Maria


Filed Under: Kitchen, Top Navigation, Uncategorized · Tagged: Blog, Box Tops, Decluttering, Junk Drawer, Kitchen, Organization

Cleaning Wood Cutting Boards

May 5, 2014 · by Maria · 9 Comments


I love my wooden cutting boards.  I have a couple that I use regularly, but this is my favorite and most-used board.  I place it next to my sink for easy cleanup.  I have used it almost daily for the past 15 years.

Cleaning CUTTING BOARDS

I use this specific board to cut up fruits and vegetables.  I use plastic boards for raw meat.  I like that I can throw them in the dishwasher once I am done and I don’t have to worry about cross-contamination with my fruits and veggies.

However, plastic boards will only last a few years before they start looking warped or discolored.  Wooden cutting boards can last many years without warping or cracking, if given the right treatment.

Everyday, I simply wipe down my board with soapy water (don’t soak it because this will cause warping) and I dry it.  That’s it.

After about a month of daily use, it starts looking a little dull.  Like hair that needs conditioning, not just shampooing.

If you want to clean and condition your board, you will need:

  1. Coarse Salt

  2. Half a lemon

  3. Cutting Board Oil You can buy it here or in the store but it must be food-safe for cutting boards.  Regular cooking oil will not do as it will go rancid.

CUTTING BOARD Cleaning

So about once a month, I will thoroughly clean it with the following method:

Before starting, make sure that you wipe it down with a wet towel.

  1.  Apply coarse salt all over the board.

Cleaning Cutting Boards

  1.  Using a lemon half and some elbow grease (from an eerily pale hand), rub the surface.  Try to squeeze the lemon while you do this.

Cleaning Cutting Board

  1.  Give the board a rinse.

Cutting Board Cleaning

  1.  Apply the oil all over the board.  I put a generous amount because I know that within a couple of hours, my board will soak up all this oil.

Cleaning Cutting Boards

  1.  Allow to soak in the oil.  I leave mine overnight.  There seems to be too much on this board, but within hours, it’s all soaked up.

Cleaning Cutting Boards

  1.  Remove the excess in the morning.  I rarely have to do this since my board always soaks up the mineral oil.

Cutting Boards

You do not have to do this cleaning process to your boards every month, if you are not using them as often.  You may get away with every 3-6 months.  It all depends on usage.

Also, don’t cut up a lemon just for this.  Do this cleaning process when you are already using a lemon for cooking.  It can even be partially juiced before cleaning the board.  It still works beautifully.

Enjoy your boards, they seem to get even more beautiful with age if cared for.

Let me know if you prefer wooden or plastic boards and why.


Filed Under: Clean, Kitchen · Tagged: cleaning kitchen, cleaning wood cutting boards, cutting boards

  • « Previous Page
  • 1
  • …
  • 32
  • 33
  • 34
  • 35
  • 36
  • …
  • 44
  • Next Page »

Welcome! I'm Maria, the blogger behind Graceful Order. I hope to share with you helpful ideas about organizing, cleaning and entertaining. I am passionate about living a healthy, balanced life with my husband and two boys. A life where I am in charge of my home and not the other way around. A life with a little bit of order, and a whole lot of grace!

  • Email
  • Facebook
  • Instagram
  • Pinterest
  • Twitter

Tips for Organizing Laundry Closets

Popular Posts from 2014

Posts of 2014

Blog Archives

Search by Month

Copyright © 2025 | Disclaimer

Copyright © 2025 · Innovative Child Theme on Genesis Framework · WordPress · Log in