Graceful Order

Organizing and Decorating the home.

  • Home
  • Organize
    • Kitchen
    • Laundry
    • Living Room
    • Bedrooms
    • Bathrooms
    • Closets
    • Office
    • Garage
    • Other
  • Decorate
    • Fall
    • Winter
    • Dining Room
    • Bedroom
    • Bathroom
    • Office
  • Clean
    • Kitchen
    • Bathrooms
  • Entertain
    • Christmas
    • Thanksgiving
    • Recipes
    • Reflect

Christmas Woodland Dining Room

November 10, 2015 · by Maria · 4 Comments

This shop has been compensated by Collective Bias, Inc. and its advertiser. All opinions are mine alone. #BIGSeason #BigLots #CollectiveBias 

Christmas Woodland Dining Room

I know what you are thinking…”at least let me finish eating my turkey!”  I know it’s a little early for Christmas decorating, but I wanted to share with you as many ideas as possible before you break out the dusty holiday boxes from the garage.  You know that I love tablescapes and this is the first Christmas table that I share this year.  I usually mix and match items that I already own and maybe add in a little new touch each year.  However, this year I am participating in Big Lots’ National Decorate Your Home for the holidays week by decorating a room in my home.

Big Lots has declared National Decorate Your Home for the Holidays Week as the week of November 16th- 22nd and I chose to concentrate on my dining room.  If you are going to decorate a dining room from scratch, you want to find beautiful and affordable options.

This was my dining room last Christmas.  I did like it, but this year I wanted to make it more colorful and cozy.

Christmas Woodland Dining Room

Big Lots has everything you need – for inside and outside your home, to get a start on the holiday season.  There was an incredible selection – some items were fun, others more formal, but when I saw their woodland-themed items, I knew those were the ones for my table.

Christmas Woodland Dining Room

Our dining table is huge and I often struggle to find the right decor that will fill up the space.  I want to share with you how to create a dramatic table setting by filling up your table without emptying the bank.

  1. Unite components instead of purchasing a big centerpiece.

Large centerpieces can be really expensive and then you feel like you have to use it year after year to make it “worth” your investment.  I would rather unite pieces that I can use together or split them up throughout the house if I choose to.  In this case, I purchased 2 pinecone garlands, 2 medium sized candleholders (with attached greenery) and the cutest deer ever to create a long and dramatic centerpiece.

Christmas Woodland Dining Room

2.  Keep the decorations low.

It is tempting to use tall items to decorate your table, but then Aunt Suzzie can’t see little Billy across the table.  I mean, maybe she doesn’t want to see Billy and in that case you can totally place a Christmas tree between them – but usually one of the best things about holiday meals is the interaction between family – especially family that we don’t see all the time.  Keep the decor low and instead spread out the items.

And seriously, how sweet is that deer?!

Christmas Woodland Dining Room

3.  Mix and match styles in order to tie the room into the decor.

In my kitchen I have a casual table that has marks from doing homework and serving dinners, however my dining room table is fancy and shiny.  When I want to use a casual and warmer theme like this one, I incorporate fancy elements with more casual ones.  In this case a red charger with beading, and a casual woven placemat.

Christmas Woodland Dining Room

4 – Skip napkin rings or make your own.

I love napkin rings and I actually collect them, but I admit that those little touches can really add to the cost of your tablescape.  I also love a simple napkin with a sprig of thyme on top of a white plate.  In this case, I am using kitchen towels as napkins and instead of a napkin ring, I am using this set of ornaments that I also found at Big Lots.  The existing loop fits perfectly over the napkin!  Next year I can use them for their intended use – ornaments.  For now, I love the earthiness that they add to the table!

Christmas Woodland Dining Room

5 – Not everything has to match.

Actually, it shouldn’t.  The table setting is more interesting with added colors and textures.  Things do have to “go” together but that doesn’t mean they have to be a perfect match.  When I found these mugs at Big Lots, I decided to purchase 4 green and 4 red.  This is what my Christmas morning breakfast table will look like and those sweater mugs are perfect for coffee or hot cocoa!

Christmas Woodland Dining Room

I added quite a few LED candles to my table.  Some were simple pillars and a few were these sweet little trees.

Christmas Woodland Dining Room

In the background of the table you can see this cute little wreath that I picked up when I “thought” I was done with my shopping.

Christmas Woodland Dining Room

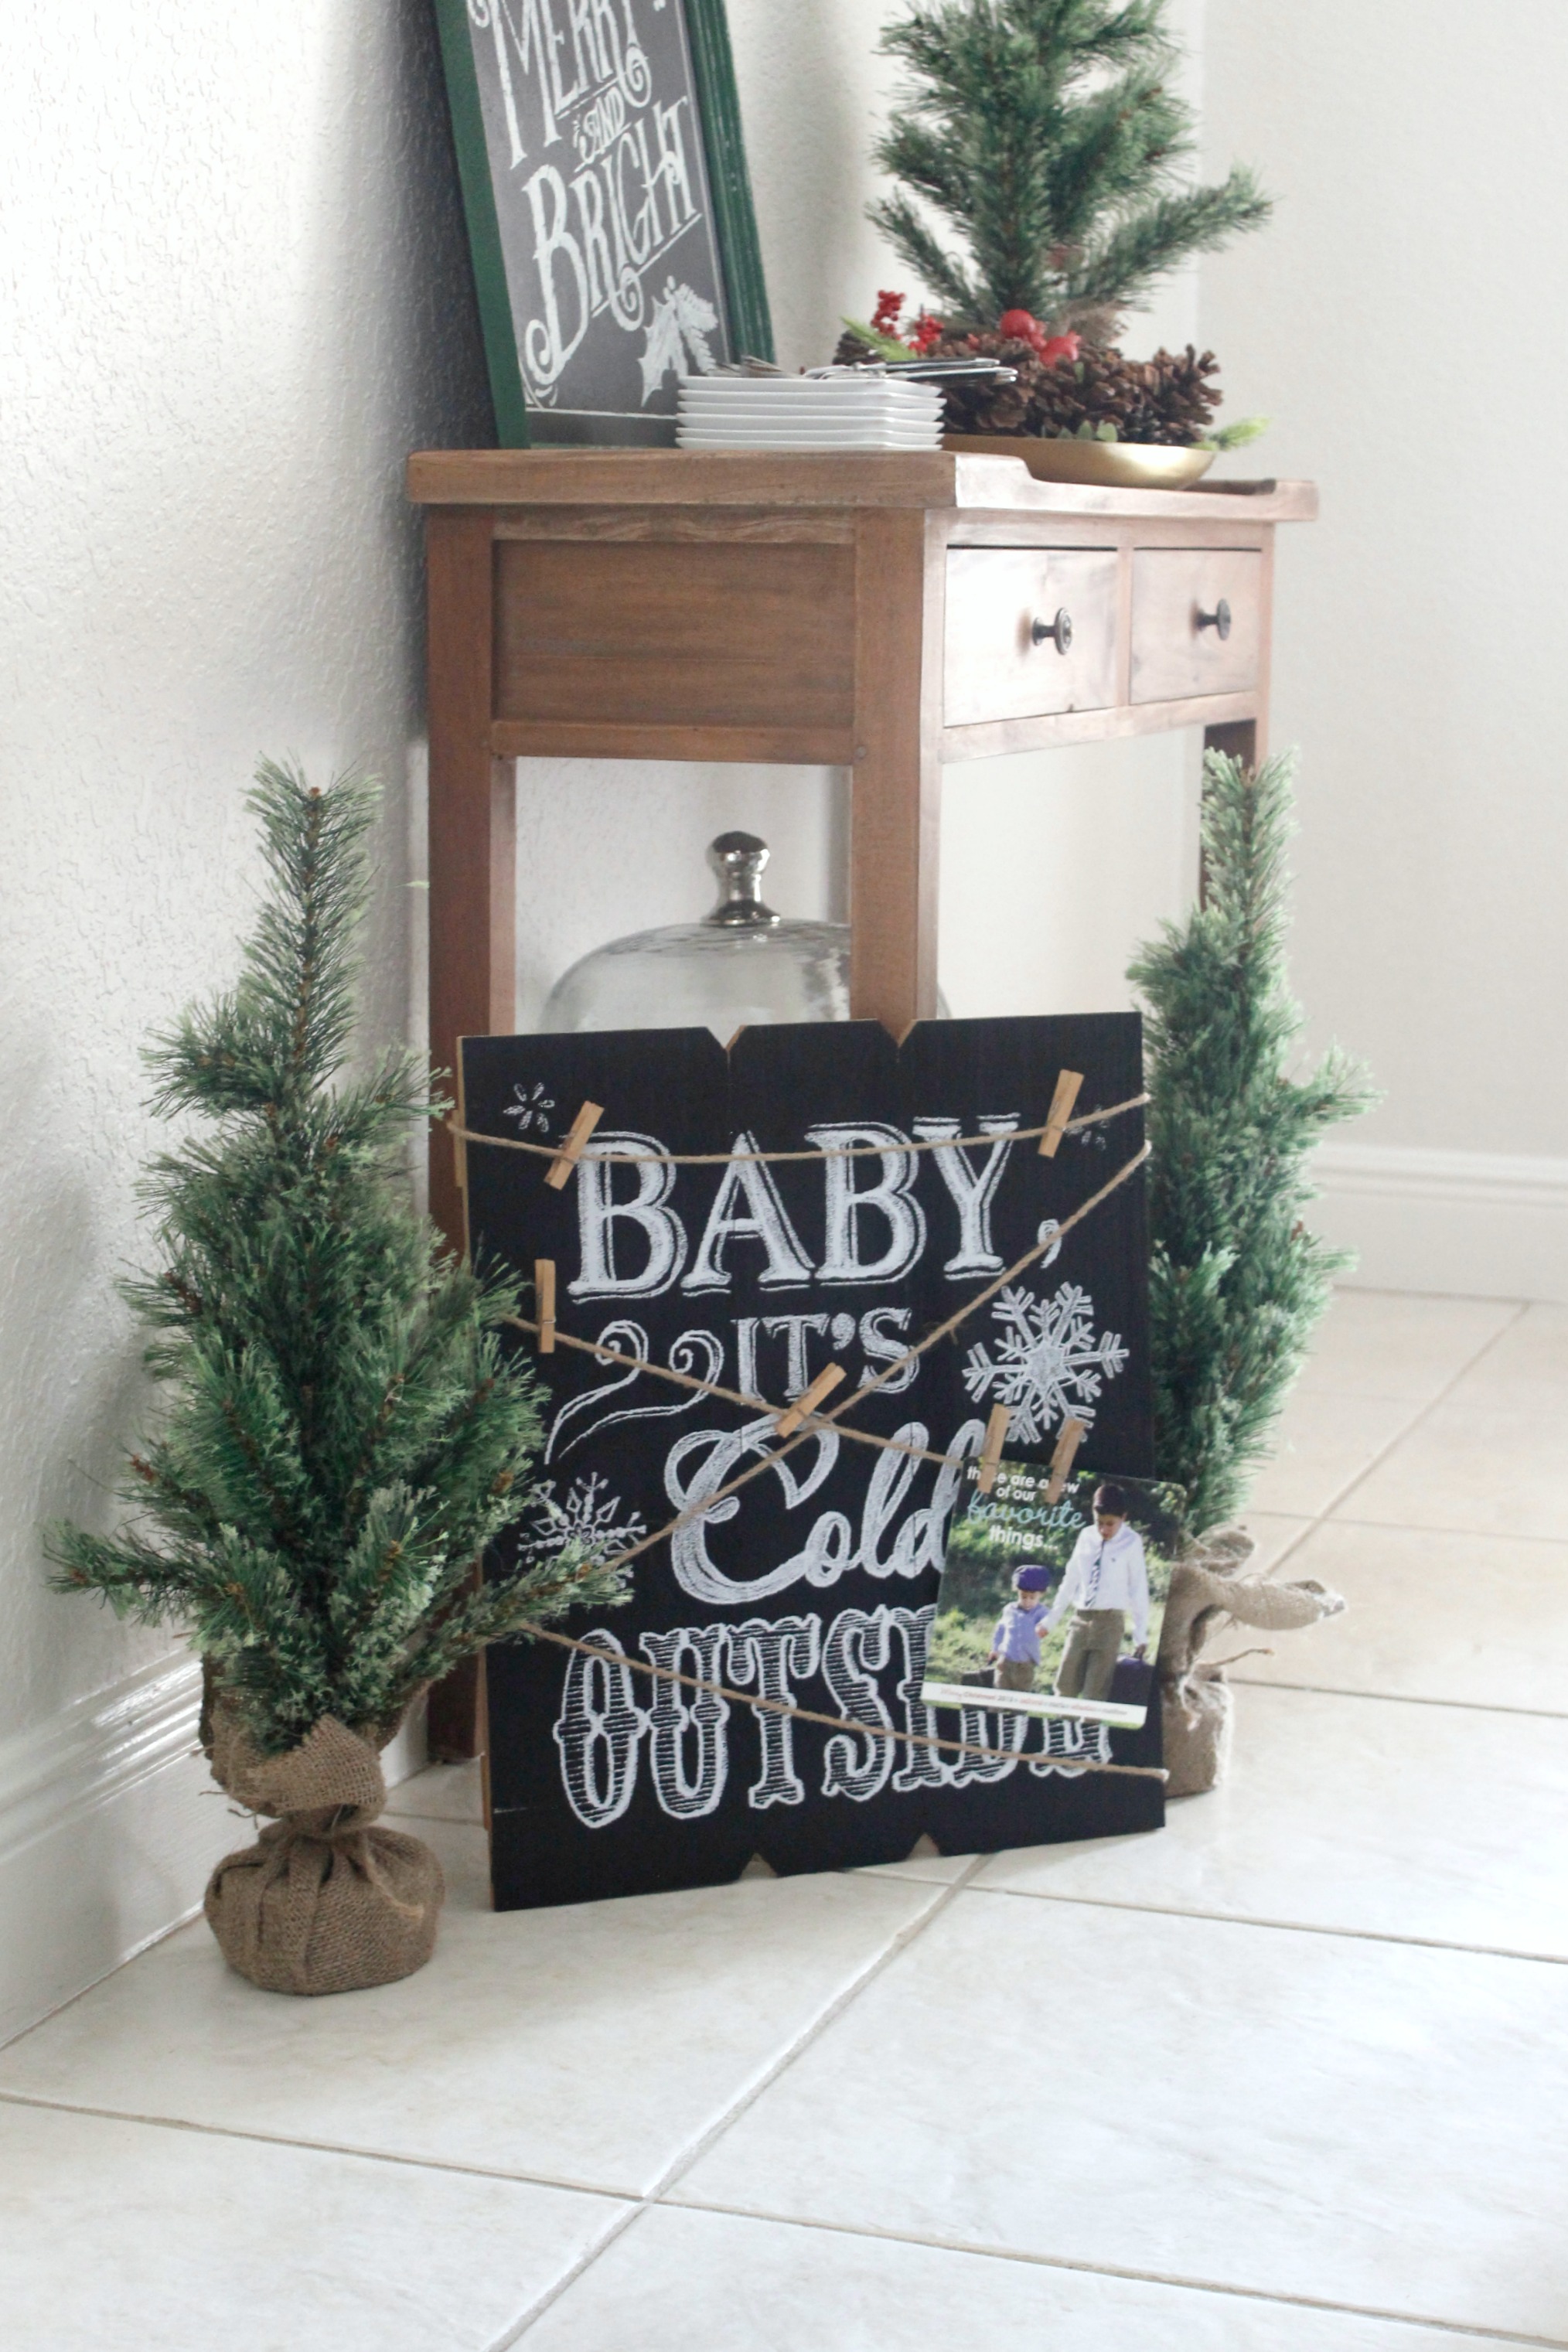
Also, since there is a small table in the corner of the room, I decided to remove the vases that are usually there, and display this lit-tree.  It was one of the first things that I picked up when I got to Big Lots.  I love that twinkle in the corner of the room and I intend to leave it simple and not add decorations.  I also picked up this little sign while I was there.

Christmas Woodland Dining Room

Talking about signs, I loved all of them!  I picked up another two to add some Christmas touches to my small buffet table.  The “Baby It’s Cold Outside” sign brings clothespins and an attached line, making it perfect to hang a few Christmas cards.   I also found these 3 little trees that really brought the woodsy theme into that dining room corner.

Christmas Woodland Dining Room

Up on top of the table are some appetizer plates, utensils and a gold bowl that I decorated with a box of filler from Big Lots.  And of course, another sweet sign!

Christmas Woodland Dining Room

I had a great time purchasing the items for this room and decorating this table.  I absolutely love this time of the year!  I completely transformed my dining room for my Christmas Day Brunch and I know my family will love it!  I was thinking of letting everyone take their mug as a gift.  What do you think?

Christmas Woodland Dining Room

Planning ahead for the holiday season and decorating earlier can mean less stress and more time for the things that matter most!  Join in National Decorate Your Home for the holidays week and transform your home into a Winter Wonderland Nov. 16th- 22nd.

Although styles and assortment vary by store, you can visit biglots.com/christmas to view the Christmas catalog and for ideas, tips, and more inspiration!

Filed Under: Christmas, Decorate, Dining Room, Uncategorized, Winter · Tagged: Christmas, Christmas table setting, Christmas tablescape, woodland

Work Desk Organization in 5 Easy Steps

November 5, 2015 · by Maria · 1 Comment

This shop has been compensated by Collective Bias, Inc. and its advertiser. All opinions are mine alone. #PutALabelOnIt #CollectiveBias

Work Desk Organization in 5 Easy Steps

You had me at label.  You all know that I love a good container, a good notebook, a good planner and lastly, a good label maker.  I use all of those to create systems in my home, in my clients’ homes and for my organizing business.  Once an area is organized, the goal is to keep it organized or at least have a great system for getting it back under control with little effort — those systems usually involve labeling.

Besides the blog, I have an organizing business that I need to keep tabs on – literally.  When you are a small business (in my case, only me) it is easy to get overwhelmed with record keeping and all the necessary papers that go into having a business.  I want to share with you my best tips for keeping your desk organized and your small business under control.  For this project, I used the DYMO LabelWriter® 450 Value Bundle Pack.

This LabelWriter has been on my wish list for a while since I have seen so many people using and loving it.  The first place I saw it was at my son’s school, where they use it to create name tags for visiting parents.  I ordered my DYMO LabelWriter online from Staples  but I encourage you to check HERE since selected stores do carry it.

Work Desk Organization in 5 Easy Steps

Within 2 days, this beauty was at my door.

Work Desk Organization in 5 Easy Steps

And all these goodies come along with it.  I purchased the bundle pack so it brought A LOT of labels in different sizes, the software CD and the corresponding plug and cable for the LabelWriter.

Work Desk Organization in 5 Easy Steps

I was able to install it in a few minutes.  Since I have a MAC, I had to download the installer file online (there is no CD-drive in Mac desktops).  Although the main purpose that I wanted this machine for was to organize my business files, I thought I would try it out for labeling the pantry.  I just opened the DYMO app on my computer, selected the label that I had inserted into the machine, and typed away all the items in my pantry.  Also, there were custom labels to chose from with over 60 different label styles and layouts.

Work Desk Organization in 5 Easy Steps

I would normally label containers when organizing clients’ homes, especially containers that are always used for the same item.

Work Desk Organization in 5 Easy Steps

Back to work!  Here are 5 steps in keeping your work desk organized.

  1.  Clean and organize your desk.

I know, sounds silly and obvious but a messy desk can make you feel drained and overwhelmed even before you start working.  I like to start with a clean slate and then slowly add the items that I need.  Go ahead and discard all those pens that no longer work and give away the ones that you don’t like.  There is no need to give precious real estate to items you no longer need and love.

Work Desk Organization in 5 Easy Steps

2.  Create a Filing System

I have a filing system for personal and a different one for business.  Actually, I have one for the blog and then another for the professional organizing business.  Here is my personal which I color code:

Work Desk Organization in 5 Easy Steps

I have another one for each business that is not color-coded.  On my desk, I keep the business files that I am currently working on and also the receipts.  After those files are no longer necessary to have on hand, I file them in the cabinet.  I know myself and I would not have the discipline to open the cabinet every time I had a small piece of paper to file, so the small system on the desk works for me.  It is important to know yourself.  No system will work if it isn’t suited for your living or working style.

Work Desk Organization in 5 Easy Steps

I created these files using the DYMO which literally took minutes.  Each folder is dedicated to an aspect of my organizing business and I can file things immediately without allowing them to stack up on my desk.

Work Desk Organization in 5 Easy Steps

3.  Keep essentials at hand

Although you don’t want a bunch of visual clutter, it is important to have a spot for all the items that you use and reference daily.  For me its these books, calendars, tape and stapler and a few other essentials that I keep close by.


Work Desk Organization in 5 Easy Steps

4.  Make lists and keep one calendar

I make lists about making lists!  Seriously, lists keep me from feeling like I am out of control, especially on really busy weeks.  I keep a master list and check it off as the day progresses.  I am also a fan of planners that I can write in.  I like the sense of accomplishment in crossing a task off with a pen.  Whatever planner/calendar works for you is fine but keep just one.  I keep 2 but only because one is solely an editorial calendar for the blog.  If you have a digital calendar and then a physical calendar, things can get confusing and you can end up missing an appointment.  I do use my phone for reminders but I log everything in my one planner.

5.  Sort mail immediately

This is huge!  One of the largest contributors of a messy desk is mail.  I have tried to unsubscribe to as much junk mail as possible but somehow it keeps coming in.  If you cannot sort the mail the moment you walk in, then don’t come in with mail in your hands.  The moment you bring the mail inside separate it into files or bins that read: To File, To Read, To Contact and discard the junk mail ASAP.

Work Desk Organization in 5 Easy Steps

After working on my files, I decided to use the address labels that came in my bundle for my business holiday cards.  Of course, yours would actually have a real address. 😉

Work Desk Organization in 5 Easy Steps

This machine has earned a spot on my desk and it is now considered one of my essentials!  Here are a few details about what makes this LabelWriter unique:

  • Eliminate the waste and hassle of sheet labels – print precise quantities without difficulty.
  • Customize and print address, shipping, file folder labels, plus name badges and more – all from your PC or Mac®*
  • No need to buy ink for this printer (we all know how expensive ink is) as it is a thermal transfer technology.

I can’t imagine this machine being any better, but there is also The LabelWriter® 450 Turbo that is available, taking the outstanding performance of the LabelWriter® 450 to another level.  The Turbo prints up to 71 labels per minute…wowzer!  It eliminates the waste and hassle of sheet labels by printing precise quantities without difficulty.  It also allows you to print USPS®-approved postage stamps directly from your desktop, taking the outstanding performance of the LabelWriter® 450 to another level.

Work Desk Organization in 5 Easy Steps

  • Be sure to go check back every week for Staples Daily Deals for special deals on your favorite DYMO LabelWriter® products including DYMO LabelWriter® 450 Bundle, LabelWriter® 450 Turbo, and LabelWriter® 4XL Turbo!

Walking into an office that is neat is not only welcoming but it encourages you to build your business.  Why?  Because visual clutter becomes mental clutter.

Enjoy your clean desk and let me know what are your favorite tips for keeping your office under control.

Filed Under: Office, Uncategorized · Tagged: desk organization, labels, office

Glamping in the Fall

November 3, 2015 · by Maria · 6 Comments

This shop has been compensated by Collective Bias, Inc. and its advertiser. All opinions are mine alone. #FallGlamping #CollectiveBias

Glamping in the Fall

Have you ever been camping?  How about glamping?  GLAMping pairs camping and luxury and it’s just what we did this past weekend.  I asked my boys if they wanted to get away overnight and go camping, eat s’mores and pizza.  They said yes before I finished explaining.  I know…what sweet, self-sacrificing boys!

So we headed out to the Florida Keys to a campsite inside Long Key State Park.  This is about an hour and half from our home.  We invited my parents to come along and they didn’t hesitate.  So we (as in my husband) loaded up the car and headed south.

Glamping in the Fall

This is the famous road leading to the keys.

Glamping in the Fall

And my awesome, hardworking husband who doesn’t mind driving, setting up camp and grilling up a storm.

Glamping in the Fall

Before arriving at our campsite, we stopped by another state park to look around.  It’s so much fun to leave the house and explore places that you didn’t know were right around the corner.  Seriously, there is always something to do and sometimes we have to press the pause button and get away.

Glamping in the Fall

My lovely Mom enjoying the scenery.

Glamping in the Fall

And my sweet “baby” that was so happy to go on his first camping trip.  His older brother and my husband camp often, but he stayed behind because he was too little.  Until today!

Glamping in the Fall

We got back on the road and finally arrived at our camping spot.  I was happy to find out that the bathrooms were very close.  That’s an important “glamping” tip.  I have been to campgrounds that don’t have bathrooms and … yeah, bathrooms are better.

Glamping in the Fall

My boys immediately wanted to check out the spot.

Glamping in the Fall

Checking things out with Grandma.

Glamping in the Fall

Before the car was even unloaded, my husband turned on the camping grill.  We were starving!  We didn’t have lunch before leaving the house and we were ready to tear into the pizzas.

Glamping in the Fall

And then everyone pitched in to build the tents.

Glamping in the Fall

And there they are!  They built them in no time because they are so used to it.

Glamping in the Fall

My little explorer in the background.

While the boys were building the tents, I got to work with setting the table.

Glamping in the Fall

These were paper plates and real utensils.  I can’t do plastic utensils when we are camping because while plastic works for some food, it’s not sturdy enough for everything.  I would dispose of the plates, but I would wash and re-use the flatware.  I always bring a small bottle of detergent and a sponge to wash things.   There was a nearby water pump that  made it really easy.  Running water — glamping must.

Glamping in the Fall

I also picked up some broken branches and used them for my little centerpieces.

Glamping in the Fall

Some even had little wild flowers.  Aren’t they sweet?

Glamping in the Fall

The pizzas were still frozen so we took them out of the box and got them on the grill asap.  We have grilled Freschetta® Naturally Rising pizzas before and we love them.  Their crust is made like fresh baked bread with only natural yeast and no chemical leaveners.   As far as grilling, a closed grill will work better and will yield that beautiful browning of the cheese.  This kind of open grill with the breeze, yielded a perfect crust and taste without too much browning.  I assure you that the taste was amazing and it was so cool to be making pizzas while camping!

Glamping in the Fall

  • Preheat grill on high for at least 5 minutes
  • Remove pizza from carton and clear overwrap film
  • Place double layer aluminum foil large enough to cover the bottom of the pizza on center of grill (we cut out a piece the size of the pizza and placed underneath to protect the crust).
  • Cook for 13 to 16 minutes and allow to stand 2 minutes before serving

Glamping in the Fall

Hot and ready!

Glamping in the Fall

As a dipping sauce, I served an olive oil and roasted garlic sauce.  We used this sauce for dipping the pizza and also the meats that we made for dinner.  It was delish!

Part of the Glamping experience is to know what to make ahead of time and what to make on the spot.  I made this sauce earlier in the morning before leaving home.  I heated up a 1/4 cup of extra virgin olive oil and I peeled a whole head of garlic.  Over low heat, I allowed the garlic to “roast” in the oil until it was this caramel color.  Of course, you can roast garlic in the oven or even over the campfire, but it takes longer.  Everyone loved this sweet garlic sauce, especially to dip the pizza crust!

Glamping in the Fall

I also used some of the little broken branches to decorate my table.

Glamping in the Fall

And some chocolate chip muffins that I brought from home.  We actually ended up eating them for breakfast next day.

Glamping in the Fall

Because we devoured these!  In little mason jars, I placed two chocolate cream cookies and crushed them.  Then I topped them with some cold whipped topping and finally some crushed Honey Maid crackers.  Just for the boys, I added a few gummy worms.

Glamping in the Fall

We all loved them!

Glamping in the Fall

See?

Glamping in the Fall

Then my little one asked if he could eat pizza again — while holding onto dessert.  I’m thinking you have to finish one before you can move on to the other.

Glamping in the Fall

After lunch the boys played and got in the water for a little bit.  These smiles don’t lie.  They were having so much fun just being out there!

Glamping in the Fall

So I placed my attention to the tent.  I made the inflatable bed with a bedspread that I found at Wal-Mart and it was perfect for camping.

Glamping in the Fall

Then I took out another glamping touch – my little chandelier.  I have to admit that I got a few eye rolls from the boys but they had to concede that the outcome was really cute — or as they say “really cool”.

Glamping in the Fall

The candles are battery-operated so there is no danger there.

Glamping in the Fall

We enjoyed the rest of the day talking and watching the boys play.  It is so important to unplug sometimes.  Unplugging from the little picture and plugging into the whole.

Glamping in the Fall

These moments give you life.

Glamping in the Fall

And these moments feed your belly.  Dinner time was here and we cooked up some chicken and churrasco.  They had been marinating since we left the house.

Glamping in the Fall

Our courteous chef did all the cutting for us.

Glamping in the Fall

We also cooked some baked potatoes at home and wrapped them in foil.  We heated them up on the grill and added some butter and that was dinner!

Glamping in the Fall

The first day was so much fun and I was fully aware that I was making memories, with my husband, parents and boys.  I was so grateful!

Glamping in the Fall

We tried to stay up really late so that we can keep chatting, enjoy all the stars and of course – eat s’mores!

S’mores are so much fun and no camping trip is complete without them.

Glamping in the Fall

So this made me laugh when I walked into my tent to finally sleep…

Before we left, my husband starts researching how to make an AC for the tent.  He purchased a styrofoam cooler (maybe $5.00), a little battery operated fan ($6.00) and some pipe (a few dollars), and a frozen gallon of water.  He placed the gallon of ice inside the cooler, cut out a place for the fan up on top and cut out the two holes for the pipe.  When he turned on the fan, cool air naturally emerged from the pipe.  Genius idea but I had to laugh when I saw the contraption.  But hey, if he overlooks the chandelier, I will overlook this thing by my bed.

This may seem silly but when you live in Miami, you fear the heat, not the cold during the camping evenings.  So did it work?  It did, but it wasn’t as powerful as he wanted.  He thinks next time he will try with a more powerful fan.

Glamping in the Fall

The night was beautiful and the next morning I went for a stroll down the beach and got these beautiful shots.

Glamping in the Fall

Breathtaking Florida Keys mornings.

Glamping in the Fall

When everyone woke up, it was time for breakfast.

Glamping in the Fall

After lunch we started getting ready to leave, but the boys (“aka” the chocolate inventory keepers) alerted us that we still had chocolate, Honey Maid graham crackers and marshmallows left over.

Glamping in the Fall

We decided to make skillet s’mores on the cast iron pan.  One layer of Hersheys chocolate bar, one layer of marshmallow, place pan on the grill and let the magic happen!

Glamping in the Fall

Ooey and gooey and Delish!

Glamping in the Fall

This little one enjoyed his first camping trip so much that he kept saying in as we drove home, “Mommy, that was the best (only) camping fun ever!”

Glamping in the Fall

You can make camping as simple or as posh as you like!  Here is a free printable list (that you can add to your basic camping checklist), that will add some glitz to your next camping adventure!

I purchased these products in my local Wal-Mart, along with a lot of the glamping items pictured above.  For some more great ideas, check out the Glamping Social Hub !

Glamping in the Fall


Filed Under: Fall, Other, Uncategorized · Tagged: Camping, Camping checklist, Glamping

My Favorite Pecan Pie Recipe

October 21, 2015 · by Maria · 7 Comments

My Favorite Pecan Pie Recipe

BattleOfthePiesGraphic

My friends at Wayfair.com announced last week that they were hosting a “Battle of the Pies”.   I was selected as well as 39 other bloggers to participate — all I had to do was submit my favorite pie recipe.  I knew that I wanted to do this challenge and I knew which pie recipe I would share.

For many years I have been the designated pecan pie maker in the family and I make it every Thanksgiving.  Every. Single. One.  Well, except for that time that we took a Thanksgiving cruise and complained the whole time that it didn’t “feel” like Thanksgiving.  Maybe we were missing home, maybe the pie…

Today I share with you my recipe.  I have tried many pecan pies and none come close to this one.  I hope you like it and love it and eat it a la mode!


The ingredients:

1 Cup of toasted, chopped Pecans

1 Stick of Butter

1/2 Cup Sugar

1/2 Teaspoon of Salt

2 Teaspoons of Vanilla extract

1 Cup light Karo Syrup

3 eggs, beaten

1 unbaked pie shell (homemade or frozen)

Note:  Before chopping the pecans, set a few aside to scatter on the top of the pie before it bakes.  This does not affect the flavor, but does make the pie prettier when there are some whole pecans on the finished pie.

My Favorite Pecan Pie Recipe


The Steps

Make sure that the rack is positioned in the center of the oven.  Set the oven to 350 degrees.

Meanwhile melt the butter in a saucepan but do not brown the butter.

Add the sugar and the Karo Syrup to the butter and allow the sugar to dissolve.

Add the vanilla extract, the salt and the pecans to the saucepan.

Set aside the mixture and allow to cool before adding the beaten eggs.

Once cool, add the eggs and stir into filling.

My Favorite Pecan Pie Recipe

Pour the mixture into the unbaked pie crust (I used frozen store-bought) and scatter a few whole pecans to make the pie prettier once it cooks.  It actually looks pretty good already, don’t you think?

My Favorite Pecan Pie Recipe

Depending on your oven, bake between 50 minutes to 1 hour.  In my oven, the pie is ready in 55 minutes.

My Favorite Pecan Pie Recipe

Serve slightly warm or room temperature.

My Favorite Pecan Pie Recipe

It is also delicious a la mode!

My Favorite Pecan Pie Recipe

There will be a total of 40 pies submitted for this “Battle of the Pies” contest!  That’s a lot of delicious pie and as my friends post their recipes, I will add their links below.

My Favorite Pecan Pie Recipe

So if this is a pie battle, how does one win?  Well, the blogger with the most social interaction (pins, shares, likes, comments) wins!  Friends, I ask that you share this recipe in your social media and use the hashtag #WayfairPieBakeOff.   I will let you know the results as soon as the winner is announced.  Thank you so much!

xo,

Maria

This post is a collaboration with Wayfair.com and I thank them for hosting this fun battle!  


Filed Under: Fall, Recipes, Thanksgiving, Uncategorized · Tagged: pecan pie, Thanksgiving

HGTV Feature – Small Spaces

October 20, 2015 · by Maria · 12 Comments

When I started this blog almost 3 years ago, I thought it may just be a space where I could journal my progress with decorating and organizing my own home.  I thought maybe a handful of friends would like it, and perhaps even be inspired by it.  My close friends and family supported me and told me how awesome the blog was even though my photography was terrible at the time (it still needs work) and I had no idea what I was doing (that still needs work, too) — they saw potential in this little blog beyond what I could see myself.  Granted, I still see this as a “little blog” and I am incredibly grateful to all of you who tune in to my projects and take the time to comment and share on your social channels…seriously, thank you!!  Blogging can be a lot of work and the published post itself is only part of the iceberg of a blogger’s daily tasks.  Maybe soon I will share more on that.  My point is that you all make the work worthwhile.  Your encouragement never goes unnoticed!

You already know that I am super long-winded and I wanted to say all that before sharing with you that this past weekend a Graceful Order project was featured online on HGTV.  I am so excited!  The post also featured other bloggers and super cool ideas, but I am grateful to be among those names!  It was a post about creative ways to use small spaces which is a favorite topic of mine.  My bathroom was highlighted since my sink area is tiny, and I use small shelves to make up for the lack of space.

HGTV Bathroom Wall

Here is the full post so that you can see the other awesome ideas for maximizing small spaces!  Enjoy and know that you are part of any triumph that I may have in this little corner of the web called Graceful Order.

xo,

Maria

Filed Under: Bathrooms, Uncategorized · Tagged: bathroom organization, HGTV, small spaces

  • « Previous Page
  • 1
  • …
  • 8
  • 9
  • 10
  • 11
  • 12
  • …
  • 44
  • Next Page »

Welcome! I'm Maria, the blogger behind Graceful Order. I hope to share with you helpful ideas about organizing, cleaning and entertaining. I am passionate about living a healthy, balanced life with my husband and two boys. A life where I am in charge of my home and not the other way around. A life with a little bit of order, and a whole lot of grace!

  • Email
  • Facebook
  • Instagram
  • Pinterest
  • Twitter

Tips for Organizing Laundry Closets

Popular Posts from 2014

Posts of 2014

Blog Archives

Search by Month

Copyright © 2025 | Disclaimer

Copyright © 2025 · Innovative Child Theme on Genesis Framework · WordPress · Log in